• Home
  • Styles
  • Panels
  • Accessories
  • GO-BRICK®
  • Vendors
  • Technical Details
  • Contact
  • Shop
Native Custom Stone

Custom Stone Manufacturer

Questions? Call us at:   (888) 823-0745

  • Home
  • Stone
    • Country VillaCounty Villa Stone
    • Castle RockCastle Rock
    • Rubble StoneRubble Stone
    • Stack StoneStack Stone
    • Ledge Stoneledge stone
    • River Rockriver rock
    • Field Stonefield stone
  • Panels
    • CustomFit PanelsCustom-Fit DIY Stone Panels
    • Go-StoneGo-Stone DIY Stone Panels
    • AccessoriesStone Accessories
  • Brick
  • Find A Vendor
  • Technical
  • Contact
  • Shop
Home » masonry

Why Should You Use Manufactured Stone Veneer In a Bathroom

Manufactured stone veneers are getting used in more and more places around the house. Everyone has seen how good it looks around a fireplace as a center piece for a room. It looks equally good on the outside of a home because it lends a certain rugged charm but have you ever considered using it in your bathroom? The basic qualities of a manufactured stone veneer are its amazing durability and its almost complete resistance to moisture and staining. If you are shopping for the perfect building materials for your bathroom then durability and stain resistance are probably the two things you are specifically searching for.
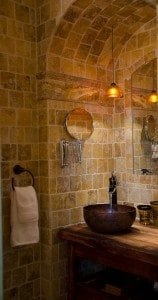
Manufactured Stone | Custom Stone Veneer | BathroomUp until recently, only the most affluent homes could have natural looking bathrooms covered in marble and other high end stone. The price tag on bathroom projects like these would sometimes rival a small house but with a manufactured stone veneer they became a much more practical design decision. Even middle income homeowners can afford to own:

  • Unique vanity top designs. These are made out of stylish stone that really adds a dash of elegance to a room.
  • Decorative accents made from cultural marble. Marble is always a hit and most people cannot tell natural stone apart from its manufactured counterpart.
  • Cultured Onyx, Granite and Piedrafina. These stones and many more are available in manufactured varieties and they are very easy to work with.

If you have never seen manufactured stone then you may think that it will look cheap or fake. Most manufactured stones are actually made from rock dust instead of plastic or synthetic materials so it is an actual stone, just not a naturally formed one. This process of formation is the main reason that manufactured stones are so easy to work with. Liquid polyester is utilized to make all the rock dust stick together and then it is covered in a non porous coating that resists stains and spotting. The end result is that you are left with a bathroom that doesn’t absorb moisture or hold onto odors and it can be easily cleaned with soap and water for the most part.

There is one thing to be careful of when buying manufactured stone veneers and that is to get them from a reputable company. Some will skimp on the manufacturing process and it can result in you buying inferior manufactured stone.

Filed Under: Custom Stone Bathroom, DIY, Maintenance and Installation, Manufactured Stone Tagged With: bathroom design, bathroom projects, building materials, construction, custom bathroom designs, custom stone, manufactured stone, manufactured stone veneer, manufacturing, masonry, stone veneer, stones, veneer

How to Remove Mortar from Manufactured Stone Veneer

Manufactured stone veneers have become a very popular project for do it yourself homeowners. The stone adds elegance and rustic charm to everything from your fireplace to the outside of your home. Since it basically amounts to sticking rocks in mortar, building a manufactured stone veneer seems like it would be very easy but it can go wrong quickly. A veneer can be ruined by things as simple as:

  • Accidentally wiping mortar that’s still wet
  • Getting excess mortar onto the stones surface
  • Overly humid conditions
  • Incorrect stone placement

Once the stones are in place, it can be a chore to remove mortar from them without damaging the stones. However, if you do make a mistake and need to remove your mortar, it can be done in seven easy steps:

  1. Manufactured Stone Veneer | Custom Stone | MortarGather the equipment that you will need for the job: water, dish detergent, two stiff brushes that are not wire and rags.
  2. If the mortar is still fresh then you must wait for it to dry completely. In most situations a full day and night will be needed to thoroughly dry fresh mortar.
  3. Mix up a warm water and dish detergent solution. The only trick to this step is that you cannot have bubbles in the mixture so keep mixing until all the bubbles disappear. Set it aside for now.
  4. Using one of your stiff brushes, start wiping it across the mortar that you need to remove from your manufactured stone. It may help to put the brush at an angle so you are wiping at the contact point between the mortar and the manufactured stone. Try to get as much of the mortar off as possible during this step.
  5. Use one of the rags to remove all the dust that has been accumulated on the stones surface.
  6. Take your second brush and dip this one into your water and dish detergent mixture. Use the same technique as before to remove the rest of the mortar and give the other parts of the exposed stone a good scrub while you are there.
  7. Now give the stone another once over with regular water and look for any residual mortar. It has probably all been removed at this point but if you can still see some just repeat step five again.

Filed Under: Adhered Stone Veneer, Custom Stone Accents, DIY, Faux Stone Paneling, Faux Stone Veneer, Maintenance and Installation, manufactured stone, Tips and Advice Tagged With: brush, custom stone, detergent solution, manufactured stone, manufactured stone veneer, masonry, mortar, stone mortar, stone surfaces, stone veneer, stones, veneer

How to Repair Cracked Manufactured Stone Veneer

Quite a few homeowners have decided to install a manufactured stone veneer instead of natural rock. In most situations it is a smart decision because they look the same, last forever and cost a lot less than the natural stone equivalent. Over time any type of veneer can become damaged, cracked or chipped just through normal wear and tear. Unlike natural stone, you can repair your own manufactured stone veneer in 5 easy steps. Before you get started with repairs, there are a few items that you will need to get including: a small broom, trowel, cold chisel, wire brush, a hammer, grout bag and mortar mix.

  • Manufactured Stone | Custom Stone Veneer RepairStep One:  Find the damaged veneer piece and place the cold chisel on the grout line. It needs to be at a forty five degree angle with the tip of the chisel facing inward towards the stone piece. Lightly tap the hammer on all sides of the broken piece to loosen the grout and remove the stone. If it refuses to come loose, you may need to chip away at the piece itself until it comes free.
  • Step Two:  Use the wire brush to clear away the debris and dust from where the stone piece was removed in step one. Be careful of the wire mesh inside the socket because you do not want to pull it away from the foundation of the veneer. That mesh is what you will be securing the new piece onto.
  • Step Three: Measure the hole that was left and find a piece of stone veneer that will fit into it. If you cannot find one small enough you can use a wet saw to cut a large piece down to size.
  • Step Four: Get a bucket and mix the mortar with water until it thickens into a paste.
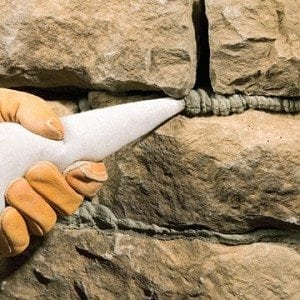
  • Step Five: Apply a thin coat to the wire mesh, otherwise known as a Skim coat. Then you can apply a half inch thick layer of mortar onto the Skim coat using a trowel. If that is too big then you can substitute a putty knife. Now apply a half inch layer of mortar to the back on the replacement stone piece and press it solidly into place. Once the piece is in position you can use a grout bag to squeeze out a line of grout around the perimeter of the new piece. After that the only thing left to do is wait for it to dry.

Filed Under: DIY, Maintenance and Installation, Manufactured Stone, Tips and Advice Tagged With: building materials, custom stone, manufactured stone, manufactured stone veneer, masonry, repair crack, stone repair, stone veneer, veneer, veneer repair

10 Steps to Install Custom Stone Veneer Around Windows

A custom stone veneer is a great way to add a little style to your home. It can make your house look like it was built entirely from stone but at a fraction of the cost of natural stone. To save a little money, homeowners with a do it yourself frame of mind have attempted to install their own custom stone veneer. As long as you’re careful, it is possible but you have to be sure and take extra precautions around your windows. If they are not sealed properly then you can leave yourself open to leaks and future water damage.

Before you get started on the steps below, you need to gather a few materials. For this project you will need:

  • Metal weep screed
  • Metal cap flashing
  • Silicone Adhesive

Step 1: On the plywood boards that form the outside of the house, known as the sheathing, you will find flashing tape installed. Squeeze out a beaded line of silicone adhesive in a zigzag pattern across that tape.

Step 2: Take your metal cap flashing and press it solidly against the flashing tape with the bottom edge against the top edge of the window.

Step 3: Now you will need to nail a metal weep screed into place over the top of the metal cap flashing. This will help to divert water away and act as a moisture guard.

Step 4: Starting at the bottom of the wall, begin installing the veneer and work your way up. When you get to the last piece of veneer, you have to measure the distance between it and the edge of the window and mark a line onto the back of the veneer.

Step 5: Cut along the line that you marked using an electric grinder but only cut about halfway through the veneer.

Step 6: Now place the veneer face down on a worktable with the line you cut running along the edge of the table.

Step 7: Using a hammer, gently tap on the part of the veneer sticking out past the table to break it along the line and remove excess material.

Step 8: Spread water over the back of the veneer piece to keep it from absorbing water from the mortar. If you don’t, it will cause the mortar to crack.

Step 9: Apply a half inch of mortar to the back of the piece and onto the wall where it will be placed. Then press the piece firmly into position.

Step 10: Repeat these steps as needed for the remaining windows.

Filed Under: Custom Stone Accents, DIY, Maintenance and Installation Tagged With: 10 easy steps, architecture, construction, custom stone, masonry, masonry veneer, stone veneer, stone window, stones, veneer, window accents, window stone

Seal Your Custom Stone Veneer in Just 4 Easy Steps

Adding a manufactured stone veneer to your home can go a long way toward improving its curb appeal and possibly its overall value as well. If you are trying to sell your house, a custom stone veneer can give it an upscale look that will set it apart from your neighbors. In order to keep costs down some homeowners have decided to tackle the project on their own instead of hiring an expert for the installation. The process is not too difficult and even inexperienced people can install it if they pay close attention to detail. However do it yourselfers often make the mistake of forgetting to seal their work.

Adding a sealant to your manufactured stone veneer is not expensive and can be done very easily if you follow these four steps:

  1. Do not try to add a sealant to your veneer for at least a month. If you seal the veneer too soon you will trap in the moisture and defeat the purpose of sealing it in the first place. Most stone veneers need 30 days to cure properly.
  2. Purchase sealant that is penetrating but can still breathe. If you are unsure about which to purchase, just ask the salesperson at your local hardware store and they should have no problem directing you to the right product. Use a paint brush to apply a thin coating of the sealant over the entire surface of the veneer.
  3. Read the sealant’s directions for how long it needs to dry and follow it exactly. You can really mess up the finish of your veneer if you try messing with your sealant before it has had time to dry all the way.
  4. After the first coat is completely dry, you need to apply a second coat the same way. Some sealants need another coat after that but unless the directions specifically call for it, never apply more than two coats.

Filed Under: DIY, Maintenance and Installation, Manufactured Stone, Tips and Advice Tagged With: custom stone, manufactured stone veneer, masonry, materials, sealant, sealing stone, stone sealing, stone veneer, veneer

5 Steps for Creating a Custom Stone Veneer Accent Wall

Manufactured Stone  has always been a popular building material because it gives a home a natural look and is more cost effective than natural stone. If you have the budget it is always best to let a professional construct your veneer for you but if you are comfortable working with your hands, it is possible to just do it yourself as well.

Before you get started you will need to gather up a few tools and materials like a trowel, mortar mix, metal lathe, 2 inch galvanized nails, plastic moisture barrier, stone veneer, hand rake, wire brush, a hammer and sand.

Custom Stone Veneer Accent WallOnce you have everything gathered up you are ready to start with step one:

  1. Secure a plastic moisture barrier over the surface of the wall that will be your veneer. It is best to use painters tape in case you need to make adjustments or move the barrier. Next you will need to use the galvanized nails to secure the metal lathe to the moisture barrier. Try to keep the nails 6 inches apart and try to hit the wall studs as much as possible.
  2. Read the mortar package then mix the sand and mortar accordingly. This will create a cement mixture that you will begin applying to the lathe. Use the trowel to spread a thin layer of the mixture over all of the exposed lathe.
  3. While the cement mixture is still wet you need to use the hand rake to either make scratches in the cement or just rake it. This will help your stone to adhere to the surface more securely. After you have finished you need to let it set undisturbed for forty eight hours.
  4. Take one of your stone veneer pieces and apply a layer of mortar across the back about a half inch thick. Then press it into place on the wall near the top. Press firmly enough that some of the mortar squeezes out from beneath it. Keep placing pieces until you reach the bottom and try to keep the pieces as tightly spaced as possible. It will reduce the amount of mortaring you will have to do later. Let everything dry for about an hour or two.
  5. Go back across the surface and press mortar into any cracks that you see between the pieces. Use a wire brush to clean the excess cement of off the stone pieces.

Filed Under: Adhered Stone Veneer, Custom Stone Accents, Manufactured Stone Tagged With: accent wall, accent walls, building materials, construction, custom stone, manufactured stone, masonry, stone veneer, stone veneers, stones, veneer, veneers, wall

Get Creative with Manufactured Stone Veneer

With manufactured stone veneer the possibilities seem endless, and in many ways they are. There are so many different styles, colors, designs, and uses that manufactured stone veneer has that they can basically fit into whatever need and desire you have, providing the natural beauty inside and outside your home to enjoy for years to come.

There are many ways that simply stacking or arranging manufactured stone veneer, or where you decide to install manufactured stone veneer, that can greatly alter the look of the product as well as its surroundings. This means that installing manufactured stone veneer is often the most difficult and time consuming process. Not only is there is a bit of prep work involved, for those who enjoy do it yourself projects, but careful placement and deliberation is needed when it comes time to actually install manufactured stone veneer – to get the right look, as well as ensure that it will last for as long as possible. After installation there is also finishing that needs to be carried out. Again, this ensures that everything is as it should be with manufactured stone veneer. For those who aren’t as handy, call in a contractor to do the work for you and leave the work to them. Once your project is successfully completed you will have beautiful, natural-looking, durable and creative enhancements to enjoy for many, many years.

The best advice anyone can give you about manufactured stone veneer however is to get creative and think outside the box. Manufactured stone veneer is very versatile and with the wide range of options, you can make your dreams come true, whether it’s enhancing the fireplace or creating a breathtaking accent wall. For more information on how to incorporate manufactured stone veneer into your home, give Native Custom Stone a call today! With fast and friendly service, they will be able to assist you in all your project needs.

Filed Under: Custom Stone Kitchen, Faux Stone Veneer, Manufactured Stone Tagged With: building materials, custom stone, dawsonville ga, manufactured stone veneer, masonry, stone veneer, stone veneers, veneer, wood veneer, woodworking

The Advantages of Faux Stone Paneling

Stone veneer panelingmay be one of the best choices for consumers today. For those who wish to install traditional stone, you can do so, with the help of professionals. However, with paneling, you have far more flexibility and far more homeowners can easily install it in their homes. There are numerous advantages of using this product over traditional stone.

Faux Stone Panel

One of the key benefits that may not be as easy to see is that it is easier to handle. In short, stone veneer panels are lightweight far more so than traditional stone. That is because they are reinforced using lighter weight aggregates. This allows these panels to be durable but also keeps them light enough to easy to install without a great deal of structural strength necessary (though you still do need to ensure you meet the product’s needs.)

This shows another advantage of stone veneer paneling, then. It is easier to install. You can install it on or near just about any surface with ease, even on drywall. You can install it on wood, concrete or metal, too. It is easy to cut to fit and does not require a great deal of woodworking skills to make it happen. You need to know some basics in woodworking, of course.

Perhaps the most important of the advantages of stone veneer paneling is its cost that does not compromise its beauty. This is a great aesthetic choice in nearly all cases because it looks like natural stone. It has all of the same features of natural stone, in texture, shape and color, but it is manufactured. For many people, it is simply the best option because it is available, in wide assortment of styles, without requiring a very high budget. These factors play an important role in the decision to use this product over others.

Filed Under: Faux Stone Paneling, Maintenance and Installation, Tips and Advice Tagged With: advantage, advantages, drywall, faux stone, faux stone panels, installed, masonry, natural stone, paneling, panelling, property, stone veneer, stone veneer panels, stones, veneer, visual arts, weight, wood, wood veneer, woodworking

Search This Site

Technical

  • Download Our Brochure
  • Go-Stone Panels
  • CustomFit® Stone Panels
  • Stone Installation
  • Cleaning Instructions
  • Technical Details

Testimonials

We had the complete exterior of our home re-done by Native Custom Stone 2 years ago and are STILL in love with the results!! They took a very plain-looking wooden exterior and made it into something that is striking and eye-catching.

Visit the Showroom

Visits to the Native Custom Stone Showroom are by appointment only. Call (888) 823-0745 today to schedule!
 

Find a Vendor

Filter by

No results found in this location. Please try again.

Get Directions

Add Waypoint
show options hide options
Print directions Reset directions
Fetching directions......
Reset directions
Print directions

Contact Us

Stone Types

  • Castle Rock
  • Country Villa
  • Field Stone
  • Ledge Stone
  • River Rock
  • Rubble Stone
  • Stack Stone

Tech Links

  • CAD & Installation Details
  • BIM | Revit | Autocad
  • Testing & ICC-ESR Report
  • 3-Part Spec & MSDS
  • Product Warranty
  • LEED Details
  • Cleaning Instructions
  • Product Data

Resources

Native Custom Stone Lunch and Learn | Stone Installation Information Download Our Brochure | Native Custom Stone Brochure Download

Contact Info

Native Custom Stone
236 Hightower Parkway
Dawsonville, Ga 30534
Phone: (888) 823-0745
Phone: (706) 216-5545

Follow Us!

Follow Us on FacebookFollow Us on LinkedInFollow Us on Blog

Actual stone colors may appear different in pictures due to pigments and lighting. Native recommends viewing actual samples prior to placing an order.
Website Designed by: Grater Digital |  Sitemap  |  Privacy Policy