• Home
  • Styles
  • Panels
  • Accessories
  • GO-BRICK®
  • Vendors
  • Technical Details
  • Contact
  • Shop
Native Custom Stone

Custom Stone Manufacturer

Questions? Call us at:   (888) 823-0745

  • Home
  • Stone
    • Country VillaCounty Villa Stone
    • Castle RockCastle Rock
    • Rubble StoneRubble Stone
    • Stack StoneStack Stone
    • Ledge Stoneledge stone
    • River Rockriver rock
    • Field Stonefield stone
  • Panels
    • CustomFit PanelsCustom-Fit DIY Stone Panels
    • Go-StoneGo-Stone DIY Stone Panels
    • AccessoriesStone Accessories
  • Brick
  • Find A Vendor
  • Technical
  • Contact
  • Shop
You are here: Home / Archives for Faux Stone Veneer

How Fake is Faux Stone?

By definition, faux stone is fake or false, or more kindly, it isn’t natural made stone.  However, because it is deliberately made in imitation of real stone, it doesn’t have to look fake at all.

So, perhaps the question should be: How can I prevent faux stone from looking fake? But first, it pays to get your head around the concept of faux stone.

Stack Stone
Stack Stone from Native Custom Stone

What is Faux Stone?

There are different types of faux stone, the most common being cast in molds using a fine-aggregate concrete. Molds are made from different types of naturally occurring rock and stone so that both surface finish and size mimic what is found in nature. The concrete used depends on the preference of manufacturers, but it is commonly made with a mixture of cement, suitable building sand, and very finely crushed stone rather than the coarse aggregate used for the concrete used for foundations and footings.

Traditionally, faux stone was only available in single units in imitation of the individual units a stone mason would prepare for building. Faux stone veneer is considerably thinner than full-scale rocks or stones.

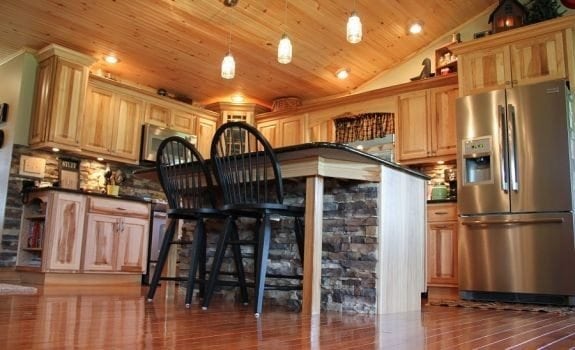
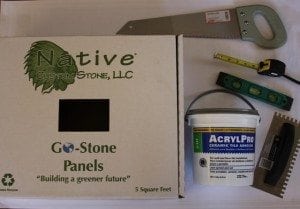
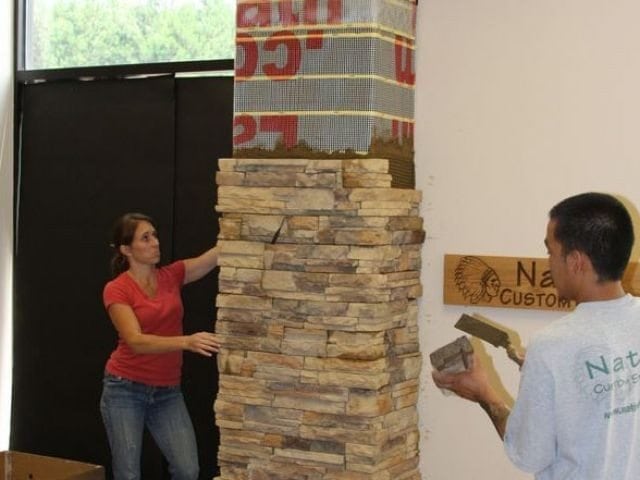
Native Custom Stone produces several manufactured stone veneer products, including a range of Custom-Fit faux stone panels that interlock, simplifying the installation process for DIY enthusiasts.

Native Custom Stone also produces an eco-friendly variant of faux stone veneer made with recycled materials including rubber tires. Lightweight and easy to install, they are sold in a panelized form.

How to Prevent Faux Stone Looking Fake

When a stone mason builds a wall, he will choose his bonding pattern based on the stone used and the look required. Also, he will decide whether to lay the stone dry or to use mortar to bond it as bricklayers do when they build brick walls. Since no one individual rock or stone will look identical to another, there is no risk that the stone elements will look fake. But, the skill of a stonemason is to make the wall itself look natural!

If you’re going to build a faux stone wall or have one built, here are a few tips to help ensure it won’t look fake.

  • Choose a product that looks natural.
    • If using individual stones make sure you buy a good selection of different stones to be able to create a more random impression.
    • Faux stone panels are manufactured so that adjacent stones are not the same, making them a good option for DIY.
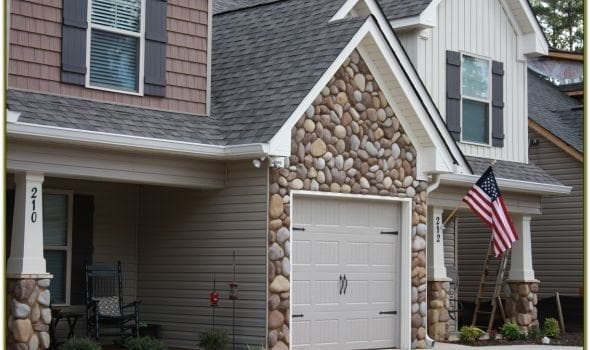
  • Choose a product that looks reasonably similar to natural stone found in your region and install it so that it looks like walls typically built with these materials.
  • Take care not to install faux stones and panels that are the same right next to or above one another. A repetitive pattern is a dead giveaway, and if a faux stone wall looks fake so will the faux stones it is built with.
  • Make sure that the design of the installation is something that could genuinely be built with natural stone. For instance, if it’s used above a wide opening and covers the lintel, it’s likely to look very fake.

Whether you want to use faux stone for a DIY project or have a contractor do the work for you, contact Native Custom Stone for more information. Alternatively, Go-Stone and Custom-Fit faux stone panels, and other simulated stone products are available from Home Depot online or from Build Direct.

Filed Under: Faux Stone Paneling, Faux Stone Veneer, Manufactured Stone

Building a Bar from Scratch and Finishing With DIY Go-Stone Panels

A home bar is a great place for entertaining. You can plan it so that it becomes the hub of your home, or so that it can be used as a hideaway where the guys (or girls) can escape out of sight and sound.

The location you choose depends on the space you have available in your home, as well as the function you want this special entertainment area to fulfill. If you don’t have much space you can tuck it in a corner; but if you want to incorporate a games area, perhaps with a pool table or home theater, you will need a dedicated room or a basement.

Go Stone

Designing a Bar From Scratch

While the dimensions of a bar are variable in terms of length, height and width are standard for practical reasons. Generally a bar top shouldn’t be wider than 16 to 20 inches (400 to 500 mm), which is about the width of a standard desk. Anything more than this is simply a waste, both in terms of materials and space, though the top should overhang the bar structure by at least eight inches (200 mm.) A bar molding will finish the top off nicely, and will help to keep drips and spills from dribbling onto the laps of those sitting at the bar.

While not all home bars incorporate a drinks rail on one side, for you or the barman to mix drinks, it’s a very useful feature. It should be separated from the rest of the bar top by a drip lip in the form of a thin strip of wood that will keep any spills from splashing on the bar top itself. Additionally, a lower counter on the barman’s side is great for preparation and also a good place to keep unwanted bits and pieces out of sight. If you want to incorporate a bar sink, this is where it should go.

The height needs to accommodate the bar stools you plan to use. Most are 30 inches (about 760 mm) tall, which is perfect for the standard bar height of 42 inches (just over a meter.)

While space might be the deciding factor in terms of the length of your home bar, you should allow 24 to 30 inches (600 to 760 mm) for each bar stool.

Foot rails should be seven to nine inches (177 to 228 mm) off the floor; these can be in the form of a metal railing (either brass or stainless steel) or timber.

Then there is the question of finishes, which of course depends partly on what you use to build the bar structure. If it’s solid wood and you’re going to leave the top wood, then you’ll need to give it a few coats of tough, hardwearing varnish. Tiles are another option; or, if it fits your budget, a good solid surface like marble, quartz or granite would be even better. Tiles and solid stone are ideal options if the bar is constructed with a material like chipboard.

You can use Go-Stone panels to finish vertical surfaces – and if there is a suitable wall behind the bar, to finish this too and create a good-looking feature wall that matches your bar.

Installing Go-Stone Panels

Go-Stone panels are ideal for any DIY build-your-own bar project. Manufactured for interior use, it is lightweight and super-easy to install. You don’t need specialized tools, masonry skills or experience, and the system is quick and clean.

Native Custom Stone

The product, which is manufactured by Native Custom Stone from 87 percent eco-friendly materials, is sold in DIY kit form. There are three finishes, Cedar Creek, Cherokee, and Coastal Blend, each of which looks just like real stone. There is enough to cover an area of five square feet (0.465 square meters) in each box. Corner pieces are packed separately, with four linear feet (1,2 meters) in a box.

The only equipment you need to install these simulated stone panels is a:

  • Steel measuring tape
  • 12 inch (about 300 mm) spirit level
  • ¼ inch notched floor trowel
  • Drywall or wet-cut saw. You can use a circular saw if you have one.

You will also need a good quality ceramic tile and stone adhesive to stick the panels onto the wall and/or bar structure.

Installation instructions start with ensuring the surface is clean and dry. It’s a good idea to cover the floor adjacent to the bar and wall you are cladding for protection. You can use cloth or rosin paper to do this.

Then start installing the panels at the bottom corner of the wall or structure. Apply the adhesive to the back of the first stone panel and set it in place, moving it firmly from side to side to ensure there are no air bubbles. The kit contains three different sized panels: alternate these for a realistic effect. The horizontal edge of the panels must be level, so use the level after setting every third stone to check that they are in fact level. You may need to cut one of the panels to ensure that the panels fit perfectly; you will need to measure the exact length. Be sure to wear safety glasses when cutting.

When you start on the second “course” of stone, make sure you stagger the panels so that you don’t end up with obvious seams running vertically up the wall or bar structure. So, if for instance you started with a 16-inch (406 mm) panel, use either an eight-inch (203 mm) or a 12-inch (305 mm) panel above it.

It really is that easy!


Filed Under: Faux Stone Paneling, Faux Stone Veneer, Go-Stone Panels, Maintenance and Installation

Using Custom Stone Veneer vs. Natural Stone for Your Project

Natural stone creates an amazing effect in homes and gardens, for walls and for feature structures including fireplaces, outdoor kitchens, water features and planters. But there’s a certain irony about this statement because you can create exactly the same effect using a custom stone veneer, and you’ll find it’s generally easier, cheaper, and much more manageable to maintain.

River Rock

While there is a certain mystique about natural stone, largely based on tradition and the age-old skills of practiced stonemasons, modern technology has enabled us to manufacture faux stone in various forms, including veneer. Custom stone veneer and other faux stone products are perfect for both construction and finishing projects. Stone veneer is also a great tool for revamping and renovating walls and other indoor and outdoor features.

Effects You Can Create Using Custom Stone Veneer

Here’s another irony: unless you have an unlimited budget for natural stone, you have many more choices in terms of the effects created by using faux stone and veneers than you do when using natural stone. The reason is simple. When you use the natural stone from the area where you live, you are limited to what stone occurs naturally. If you opt for faux stone blocks or custom stone veneer you are limited only by the range produced by an accessible manufacturer like Native Custom Stone.

The reality is that manufacturers offering manufactured stone veneer products have dozens of styles and colors. There are also numerous different finishes and sizes that will give you the opportunity to copy any effect from an elegant castle stone finish to a typical rubble effect like the traditional ashlar, commonly used in southern USA.

Alternatively, you might want something that looks as if it was built using genuine fieldstone or perhaps river rocks. No need to go into the field or seek out a river, a good quality custom stone veneer or manufactured stone will provide you with the materials you need.

Working With Stone Veneer Rather Than Natural Stone

Custom Fit Stone

Traditional stonemasons didn’t need university degrees to do their work, but they did need incredible skills that were generally passed down through the generations.

While stone can be used in the form of boulders or random blocks, unless you are building a rockery or irregular dry-stone structure, the stone will need to be cut into blocks or slabs that will slot together or enable them to be laid neatly and effectively. Natural stone is heavy and can be challenging to cut.

Stone veneer, on the other hand, is available in the form of individual units or simple panels. Interlocking panels in particular, are very easy to install without any skills at all, other than the ability to use a spirit level to ensure they are laid level. They are also lightweight and easy to handle. Furthermore, no foundations or additional structural support is required and they can be used to clad a variety of frame types, both metal and wood, or even a masonry structure.

Typically natural stone walls vary in size from about 2 to 30 ins (or 51 to 762 mm). Manufactured stone veneer, on the other hand, is substantially thinner than natural stone blocks, varying in size from about 1 to 3 ins (or 25 to no more than 76 mm), partly dependent on the texture chosen.

So if you like the effect of natural stone, explore the options offered by the Native Custom Stone range of veneer products.


Filed Under: Custom Stone Bathroom, Custom Stone Fireplace, Custom Stone Kitchen, DIY, Faux Stone Veneer, Go-Stone Panels, installation and care, Maintenance and Installation, Manufactured Stone, Tips and Advice Tagged With: building materials, custom stone, manufactured stone, manufactured stone veneer, stone veneer

How to Create a Beautiful Custom Stone Patio

Most of the patios on older southern homes are just a flat slab of concrete. They are not very interesting and they definitely don’t make you want to invite friends over for a backyard cookout. The problem is that it is often too expensive to tear it out and have a new patio built. With the growing popularity of Native Custom Stone, many people have found a way around that particular problem. When you are laying down a Manufactured Stone Patio you need to have a concrete slab in place anyway so you can just build on what’s already there and a Custom Stone Patio will definitely add a little visual flair to your next get together.

If you would like to transform your eyesore of a patio into a Custom Stone Patio then you will need to gather a few materials:

  • manufactured stone patio | native custom stoneCement trowel
  • Flat ended shovel
  • Wheelbarrow
  • Concrete mix
  • Flat pacing stones
  • Masonry saw
  • Garden hose
  • Dish soap
  • Brush
  • Broom
  1. Sweep off the patio to clear all debris then clean it thoroughly. You need a spotless surface to build on. Once you are finished let it dry out.
  2. Place your stones down where you want them to go leaving about an inch between them. If they won’t fit correctly you may need to make alterations with your masonry saw.
  3. Use the shovel to mix up the cement in your wheelbarrow. Start at one end and lift up a stone. Smear about a half inch of cement on the stone and another half inch on the patio where it will go. Press it firmly back into place until it starts to squirt up through the spaces.
  4. Continue doing that with every stone. Once you have done a few go back and trowel extra cement into the spaces where needed and scrap off any excess cement.
  5. Mist the patio with your garden hose and then let it dry over night. Do it again every morning and evening for the next 2 days. After that you are finished.

Filed Under: Custom Stone Accents, DIY, Faux Stone Veneer, Maintenance and Installation

4 Reasons to Use Faux Stone on Your Fireplace…

A fireplace adds a lot to a home beyond the heat it gives off. It is usually the first thing that visitors see when entering the home and it is the focal point for family gatherings and parties. Since it is so important, people often pay exorbitant prices to build natural stone fireplaces. It is unfortunate because an experienced Faux Stone Company could build a fireplace using faux stone at a fraction of the price and it would be indistinguishable from natural stone.

Price is only one reason that you should have a Faux Stone Company build your fireplace for you. Faux stone is also:

  • Faux Stone | Fireplace | Native Custom StoneMore Durable – Stone may seem indestructible but if you have kids you will soon find out how easily it can be chipped and scratched. Faux stone is hard enough to withstand shocks and does not deteriorate over time
  • Widely Varied – Because of the high cost of shipping, most people just use the stone from the area they are in. It can be horribly limiting and give your projects a certain sameness. When using faux stone you can pick styles from around the world and mix and match to your heart’s content. You can find the perfect blend of colors and design to fit your personal preference and home décor.
  • Easy to Clean – Since Faux stone is stain resistant it can maintain its new look for years and years. Some materials are extremely difficult to clean but when it comes time to give your faux fireplace a once over, you can get the job done with some soap and water.
  • Beautiful – If you already have an existing fireplace then you can use faux stone to add in design features and aesthetic touches. It can really spruce up the old fireplace and give it a new life.

So, if you are considering adding a fireplace to your home, be sure to use a great faux stone manufacturer. You’ll be glad you did.

Filed Under: Custom Stone Fireplace, Faux Stone Paneling, Faux Stone Veneer Tagged With: atlanta manufactured stone, builder manufactured stone, faux stone, faux stone fireplace, faux stone panels, faux stone veneers, manufactured stone fireplace

How to Remove Mortar from Manufactured Stone Veneer

Manufactured stone veneers have become a very popular project for do it yourself homeowners. The stone adds elegance and rustic charm to everything from your fireplace to the outside of your home. Since it basically amounts to sticking rocks in mortar, building a manufactured stone veneer seems like it would be very easy but it can go wrong quickly. A veneer can be ruined by things as simple as:

  • Accidentally wiping mortar that’s still wet
  • Getting excess mortar onto the stones surface
  • Overly humid conditions
  • Incorrect stone placement

Once the stones are in place, it can be a chore to remove mortar from them without damaging the stones. However, if you do make a mistake and need to remove your mortar, it can be done in seven easy steps:

  1. Manufactured Stone Veneer | Custom Stone | MortarGather the equipment that you will need for the job: water, dish detergent, two stiff brushes that are not wire and rags.
  2. If the mortar is still fresh then you must wait for it to dry completely. In most situations a full day and night will be needed to thoroughly dry fresh mortar.
  3. Mix up a warm water and dish detergent solution. The only trick to this step is that you cannot have bubbles in the mixture so keep mixing until all the bubbles disappear. Set it aside for now.
  4. Using one of your stiff brushes, start wiping it across the mortar that you need to remove from your manufactured stone. It may help to put the brush at an angle so you are wiping at the contact point between the mortar and the manufactured stone. Try to get as much of the mortar off as possible during this step.
  5. Use one of the rags to remove all the dust that has been accumulated on the stones surface.
  6. Take your second brush and dip this one into your water and dish detergent mixture. Use the same technique as before to remove the rest of the mortar and give the other parts of the exposed stone a good scrub while you are there.
  7. Now give the stone another once over with regular water and look for any residual mortar. It has probably all been removed at this point but if you can still see some just repeat step five again.

Filed Under: Adhered Stone Veneer, Custom Stone Accents, DIY, Faux Stone Paneling, Faux Stone Veneer, Maintenance and Installation, manufactured stone, Tips and Advice Tagged With: brush, custom stone, detergent solution, manufactured stone, manufactured stone veneer, masonry, mortar, stone mortar, stone surfaces, stone veneer, stones, veneer

4 Steps for Applying Manufactured Stone Siding

Adding manufactured stone veneer to your home is a great way to add value, and make your home more beautiful.  Stone has been a staple building material since the beginning of time. Manufactured, or custom stone veneer, has changed up the game a little bit though.  It is less expensive, and much easier to install.  In fact, this particular project can be completed over the weekend with little or no professional help.  There are many different styles of manufactured stone veneer to choose from, so make sure you choose one that perfectly accents your home.

When you have chosen your perfect manufactured stone veneer, you’re ready to get started:

  1. Prepare the surface that you will be applying the siding to. First you will need to create a moisture barrier by affixing house wrap or roofing felt to the area. If you are preparing a masonry wall you can skip the moisture guard. Next you will need to attach a metal lath to the wall with screws or nails to give the mortar a way to gain purchase on the wall.
  2. Start to apply the mortar mixture to the lath in a layer that is between 1/8 and 1/16 thick.
  3. Start applying the stones to the mortar by holding them in place for 5 to 10 seconds. Try to keep them as tightly spaced as possible because it will make filling in the gaps much easier later on.
  4. If you fit all of the stones tightly together then you may be able to just fill in the spaces between with an S type mortar. If not then you may have to cut small pieces of stone to put between the larger stones. The best way is to mark a stone using a pencil and then use a cut off grinder to give it the correct shape.
Native Custom Stone, a lead manufacturer of custom stone veneer has high quality stone in many varieties.  They are sure to have the perfect stone to accent your home, or commercial building.


Filed Under: DIY, Faux Stone Veneer, Maintenance and Installation, Manufactured Stone, manufactured stone Tagged With: building material, building materials, construction, custom stone, manufactured stone veneer, siding, stone veneer, stone veneer siding, stones, veneer, veneers

Top 5 Places to use Manufactured Stone Veneer in your Home

Your local faux stone supplier talks about these Top 5 most popular places to install Faux Stone in your home. Manufactured stone veneer is a material that’s becoming more used recently. Faux stone veneer can be added to almost any room, including its many outdoor uses. If you haven’t thought about manufactured stone veneer or you wanted to add more to your home take a look at this list below. You might think up another great home renovation idea!

The Top 5 Rooms and Spaces to use Manufactured Stone:

1.)    Finishing an above around basement. You can add manufactured stone directly to concrete to cover up what’s peeking out from under your home. It looks great and adds value to your house.

2.)    Manufactured Stone Panels can be used as siding to your home, window seals, or door frames. A classic, it will look as if you home is made entirely of stone. Not to mention that this type can be a do-it-yourself project!  It has gorgeous results!

3.)    Bathroom and Kitchen counters and cabinets are another wonderful idea! It will give your home a timeless elegance and great functionality.

4.)    Fireplaces look wonderful accented in manufactured stone veneer.

5.)    Outdoors you can use manufactured stone veneer to accent gazebos, archways, and pool side areas. It looks great and has relatively low maintenance.neer. As if the fire wasn’t warm enough the stone makes the room much more inviting and cozy.

So, as you can see there are so many uses for manufactured stone veneer in your home. Hopefully this opened you up to all of the potential your home has. Most manufactured stone veneer has the capability to be a do-it-yourself project. There are so many styles to choose from. Native Custom Stone has dozens of styles and designs to make sure you find the perfect fit for your home. Please, don’t hesitate, give them a call today!

Filed Under: Custom Stone Bathroom, Custom Stone Fireplace, Custom Stone Kitchen, Faux Stone Veneer, Maintenance and Installation Tagged With: faux stone, faux stone suppliers, faux stone veneer, installing faux stone, manufactured stone, manufactured stone veneer, stone veneer, stone veneers

Dress it up! 7 Steps to Install Faux Stone Veneer to Your Home!

Your local faux stone supplier wants to to show you how to make your home more appealing by applying faux stone veneer. Manufactured stone veneer can be used in so many do-it-yourself projects to accent your home. It gives off the impression of sturdy stone construction without the cost and time consuming installation. One of the many great places to install manufactured stone veneer is on an exposed exterior basement.

Steps to Installing Manufactured Stone Veneer:

  1. Your surface will need to be clean, unpainted, untreated, and unsealed. For brick, concrete, or block you can apply the veneer directly to the wall.
  2. Prepare your mortar. This is the best mix: 12 heaping shovels of sand to 1 bag of type S masonry mortar.
  3. Start with you straight edges first, so, right where your siding stops. Spread the mortar approximately ½” thick onto the exposed surface.
  4. Place your stone over and under by 3” from where you want to stone to rest. Push the stone into the mortar firmly and ‘twist it’ up and over to its resting place.
  5. Dressing the joints is a critical step, its also the slowest. When the joints are drying, at about 50%, fill the shallow areas and smooth them with a jointing tool.
  6. Brush the finished mortar with a handheld whisk broom to clean off excess. Also, clean off any mortar that is on the stone with a wet rag. Do not let it rest over night without completing this step.
  7. Finish up by cleaning your area. Let the mortar dry for 24 hours and wash with a simple water hose. Apply sealer according to manufactures instructions.

This is surprisingly simple installation that will have professional results. Your home will have the look of a sturdy stone construction. Native Custom Stone has a huge selection of manufactured stone veneer designed to make the interior or exterior of your home look timeless. If you’ve been considering adding stone to your home give them a call!

Filed Under: DIY, Faux Stone Veneer, Maintenance and Installation Tagged With: faux stone, faux stone veneer, home exterior, manufactured stone, manufactured stone veneer, stone veneer

Why Should You Choose Manufactured Stone over Natural Stone?

A local faux stone supplier is talking about the differences between natural stone and manufactured stone and which one to choose. Organic Stone has been the foundation of building materials for thousands of years. Now, however, we have manufactured stone or custom stone veneer. Natural stone is a beautiful way to accent any room in your home, thought it does come with a hefty price tag, and time consuming installation that you generally wouldn’t want to tackle alone. Custom stone, however, is an inexpensive material in comparison. It’s also much easier to use for do-it-yourself projects!

Why should you choose manufactured stone over a natural stone veneer?

  • Manufactured or Custom stone is much lighter in weight in comparison.
  • Natural stone is no doubt a much more expensive choice.
  • With natural stone you must first pay to reinforce the area, such as a fireplace, to support the weight. This isn’t the case with manufactured stone.
  • It’s easier to create a custom piece from manufactured stone. The more you customize natural stone the higher the price is.
  • Custom stone is made to look real. However, it is made to be consistent. For instance, if you use custom stone on your counter tops it will look natural, yet have an even and flat surface.
  • Last but not least, custom stone is simpler to work with on a DIY project. You could easily apply a stone veneer by yourself.

If you’re thinking about adding stone accents to your home whether it is a fireplace, exterior basement, or counter top, keep in mind the benefits of custom stone. While natural stone will remain a timeless building material, manufactured stone clearly takes the lead when coming to DIY projects and accenting homes for less. Native Custom Stone has years of experience with custom stone. If you’re considering adding custom stone to your home, check out their online gallery!

Filed Under: Faux Stone Paneling, Faux Stone Veneer, Manufactured Stone

  • 1
  • 2
  • 3
  • Next Page »

Cart

Find a Vendor

Filter by

No results found in this location. Please try again.

Get Directions

Add Waypoint
show options hide options
Print directions Reset directions
Fetching directions......
Reset directions
Print directions

Contact Us

Stone Types

  • Castle Rock
  • Country Villa
  • Field Stone
  • Ledge Stone
  • River Rock
  • Rubble Stone
  • Stack Stone

Tech Links

  • CAD & Installation Details
  • BIM | Revit | Autocad
  • Testing & ICC-ESR Report
  • 3-Part Spec & MSDS
  • Product Warranty
  • LEED Details
  • Cleaning Instructions
  • Product Data

Resources

Native Custom Stone Lunch and Learn | Stone Installation Information Download Our Brochure | Native Custom Stone Brochure Download

Contact Info

Native Custom Stone
236 Hightower Parkway
Dawsonville, Ga 30534
Phone: (888) 823-0745
Phone: (706) 216-5545

Follow Us!

Follow Us on FacebookFollow Us on LinkedInFollow Us on Blog

Native Custom Stone, 236 Hightower Parkway, Dawsonville, Georgia 30534
Website Designed by: Interactive Search Marketing |  Sitemap  |  Privacy Policy