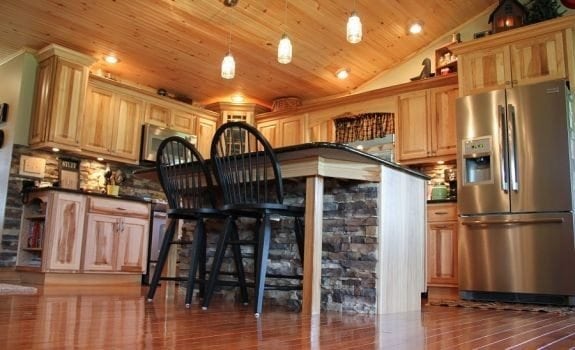
A home bar is a great place for entertaining. You can plan it so that it becomes the hub of your home, or so that it can be used as a hideaway where the guys (or girls) can escape out of sight and sound.
The location you choose depends on the space you have available in your home, as well as the function you want this special entertainment area to fulfill. If you don’t have much space you can tuck it in a corner; but if you want to incorporate a games area, perhaps with a pool table or home theater, you will need a dedicated room or a basement.
Designing a Bar From Scratch
While the dimensions of a bar are variable in terms of length, height and width are standard for practical reasons. Generally a bar top shouldn’t be wider than 16 to 20 inches (400 to 500 mm), which is about the width of a standard desk. Anything more than this is simply a waste, both in terms of materials and space, though the top should overhang the bar structure by at least eight inches (200 mm.) A bar molding will finish the top off nicely, and will help to keep drips and spills from dribbling onto the laps of those sitting at the bar.
While not all home bars incorporate a drinks rail on one side, for you or the barman to mix drinks, it’s a very useful feature. It should be separated from the rest of the bar top by a drip lip in the form of a thin strip of wood that will keep any spills from splashing on the bar top itself. Additionally, a lower counter on the barman’s side is great for preparation and also a good place to keep unwanted bits and pieces out of sight. If you want to incorporate a bar sink, this is where it should go.
The height needs to accommodate the bar stools you plan to use. Most are 30 inches (about 760 mm) tall, which is perfect for the standard bar height of 42 inches (just over a meter.)
While space might be the deciding factor in terms of the length of your home bar, you should allow 24 to 30 inches (600 to 760 mm) for each bar stool.
Foot rails should be seven to nine inches (177 to 228 mm) off the floor; these can be in the form of a metal railing (either brass or stainless steel) or timber.
Then there is the question of finishes, which of course depends partly on what you use to build the bar structure. If it’s solid wood and you’re going to leave the top wood, then you’ll need to give it a few coats of tough, hardwearing varnish. Tiles are another option; or, if it fits your budget, a good solid surface like marble, quartz or granite would be even better. Tiles and solid stone are ideal options if the bar is constructed with a material like chipboard.
You can use Go-Stone panels to finish vertical surfaces – and if there is a suitable wall behind the bar, to finish this too and create a good-looking feature wall that matches your bar.
Installing Go-Stone Panels
Go-Stone panels are ideal for any DIY build-your-own bar project. Manufactured for interior use, it is lightweight and super-easy to install. You don’t need specialized tools, masonry skills or experience, and the system is quick and clean.
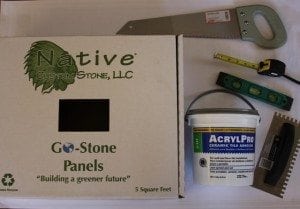
The product, which is manufactured by Native Custom Stone from 87 percent eco-friendly materials, is sold in DIY kit form. There are three finishes, Cedar Creek, Cherokee, and Coastal Blend, each of which looks just like real stone. There is enough to cover an area of five square feet (0.465 square meters) in each box. Corner pieces are packed separately, with four linear feet (1,2 meters) in a box.
The only equipment you need to install these simulated stone panels is a:
- Steel measuring tape
- 12 inch (about 300 mm) spirit level
- ¼ inch notched floor trowel
- Drywall or wet-cut saw. You can use a circular saw if you have one.
You will also need a good quality ceramic tile and stone adhesive to stick the panels onto the wall and/or bar structure.
Installation instructions start with ensuring the surface is clean and dry. It’s a good idea to cover the floor adjacent to the bar and wall you are cladding for protection. You can use cloth or rosin paper to do this.
Then start installing the panels at the bottom corner of the wall or structure. Apply the adhesive to the back of the first stone panel and set it in place, moving it firmly from side to side to ensure there are no air bubbles. The kit contains three different sized panels: alternate these for a realistic effect. The horizontal edge of the panels must be level, so use the level after setting every third stone to check that they are in fact level. You may need to cut one of the panels to ensure that the panels fit perfectly; you will need to measure the exact length. Be sure to wear safety glasses when cutting.
When you start on the second “course” of stone, make sure you stagger the panels so that you don’t end up with obvious seams running vertically up the wall or bar structure. So, if for instance you started with a 16-inch (406 mm) panel, use either an eight-inch (203 mm) or a 12-inch (305 mm) panel above it.
It really is that easy!


Follow Us!