Go-Stone manufactured stone veneer panels have opened up new possibilities for DIY enthusiasts who really do want to do home improvement projects themselves.
Available from a number of Home Depot stores, or online from BuildDirect.com, Go-Stone panels are lightweight, incredibly easy to install, and they look just like natural stone. Better still, they are made from 87 percent eco-friendly recycled materials – mostly discarded rubber tires that would otherwise end up in landfill. You don’t need any masonry or building experience to install these innovative panels, and hardly any tools.
Go-Stone manufactured stone veneer panels are available in three different colors, named according to look:
- Cedar Creek
- Coastal Blend
- Cherokee
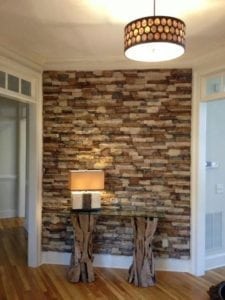
The results produce a realistic stone finish and will be sure to add a warm, upscale look to any interior.
So what tips and tricks do you need to know to successfully install Go-Stone panels?
Make Sure You Have the Right Tools and Materials for the Job
If you have done any DIY home projects, chances are you will already have all the tools needed to install Native Custom Stone Go-Stone panels. But be sure to do a check before you start.
You will need a:
- measuring tape and a pencil
- spirit or torpedo level (a 12” is perfect)
- notched floor trowel (a ¼” will do the job well)
- drywall, wet-cut saw, or an angle grinder
- rosin paper to protect the floor and painter’s tape to keep it in place (you could also use an old sheet or plastic)
- personal safety equipment including eye and ear protection for when you cut panels to size
Of course you will also need Go-Stone panels and a suitable tile and stone adhesive to stick them to the walls.
While Go-Stone panels are primarily intended for indoor use, they can be used in some outdoor environments, for instance on the wall of a covered patio that is attached to the house. In this case, it’s important to use a suitable exterior adhesive to install the panels, and it’s best to seal the surface of the panels as well.
Tips and Tricks for Successful Installation of Go-Stone Panels
 Installation of Go-Stone manufactured stone veneer is so simple anyone can do it without learning any special skills. The only building principle you need to be aware of is the need to keep the top of the panels level.
Before you start work, make sure you have everything you need, and cover the floor surface adjacent to the wall to be clad with rosin paper or an old sheet. Then wipe the wall down thoroughly with a damp cloth to get rid of dust and dirt. If there is grease or grime on the surface, it must be removed. Allow the surface to dry thoroughly before you start laying the panels.
Start laying your panels from an edge. Apply the adhesive to the back of the first panel using a notched trowel. Push the panel into place and move gently from side to side to get rid of any trapped air. Use your level to check that the top of the panel is level. This means it should be parallel with the floor, unless the floor isn’t completely flat and level, which does happen! If you haven’t used a level before, all you do is place it on the upper horizontal edge of the panel and look at the bubble in the vial set in the center of the level. It should be right in the middle, and perfectly balanced. If it isn’t, shift the panel slightly until it is.
Each package of Go-Stone panels has three different sizes, and these should be alternated both vertically and horizontally, as you lay each course. To ensure a totally realistic stone appearance, you need to avoid creating the appearance of seams, or using identical panels next to each other. Keep checking your horizontal levels regularly – at least check after laying every third panel.
When you get to the end of the first row, you might have to cut the last panel to fit the space left. Measure the space and mark this dimension on a panel so that you can cut it accurately. Don’t forget to wear eye and ear protection when using cutting tools.
If you are using corner pieces, install these before cutting panels to fit the space at the end of a row.
How to Work Out How Many Go-Stone Panels You Need
Native Custom Stone’s Go-Stone panels contain five pieces of three different sized panels – 15 in all. The sizes are 8” x 4”, 12“ x 4”, and 16” x 4“, so that each course will be four inches high. The ends of the two longer panels, and one end of the shorter one, have notches that allow the next panel to slot in neatly. Each box contains sufficient panels to cover 5 ft2, with a total of 40 vertical inches of flat, finished edges.
Corner pieces are packaged separately, with four linear feet in each box.
Go-Stone also supplies accessory pieces, including electrical surrounds for light switches, separately, to ensure a professional finish for every project.


Follow Us!