• Home
  • Styles
  • Panels
  • Accessories
  • GO-BRICK®
  • Vendors
  • Technical Details
  • Contact
  • Shop
Native Custom Stone

Custom Stone Manufacturer

Questions? Call us at:   (888) 823-0745

  • Home
  • Stone
    • Country VillaCounty Villa Stone
    • Castle RockCastle Rock
    • Rubble StoneRubble Stone
    • Stack StoneStack Stone
    • Ledge Stoneledge stone
    • River Rockriver rock
    • Field Stonefield stone
  • Panels
    • CustomFit PanelsCustom-Fit DIY Stone Panels
    • Go-StoneGo-Stone DIY Stone Panels
    • AccessoriesStone Accessories
  • Brick
  • Find A Vendor
  • Technical
  • Contact
  • Shop
Home » native custom stone

Top 3 Reasons You Should Use Manufactured Stone

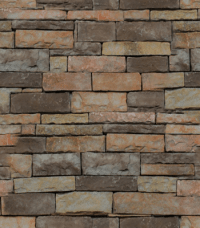
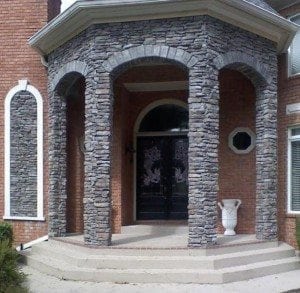
Natural stone has always been associated with quality and luxury so it is often used in homes. With the increase in demand for natural stone the price has gradually risen until people started looking for a quality alternative. Many have found it in commercial manufactured stone products. Manufactured stone is made from concrete that has been poured into a mold for its shape and given iron oxide pigments for its coloration.

The products look exactly like natural stone but in reality, it is a veneer about 2 – 3 inches thick. This means that a manufactured stone product is a fraction of the weight of natural stone, making it much easier to work with. Once the stone veneer has been put into place, it can easily last for decades or more without deterioration.

If you are still considering using natural stone in your next construction project instead of commercial manufactured stone, then consider this:

  1. Adhered Stone VeneerManufactured stone is more efficient than natural stone. Natural stone will come in a range of shapes and sizes. Before it can be made to fit into a project it has to be cut and shaped. This is often very labor intensive and time consuming. Whereas manufactured stone can be cut into the shape needed and put into place with very little fuss.
  1. Commercial manufactured stone is cheaper to purchase than natural stone. Natural stone construction will need people with specialized skills, tools and materials like reinforced footing to hold up the enormous weight involved. Without these, a manufactured stone wall often costs 1/3 to ½ less than a natural stone wall.
  1. Manufactured stone is available in a much wider selection than natural stone. Natural stone is often found locally because it is so expensive to ship due to weight. Manufactured stone can be made to look like stone from anywhere in the world and it is light enough to ship if needed.

Filed Under: Custom Stone Fireplace, Custom Stone Kitchen, Manufactured Stone Tagged With: commercial stone, custom stone, custom stone accents, custom stone panels, custom stone veneer, faux stone veneer, manufactured stone, manufactured vs. natural stone, native custom stone, residential stone

How to Install Your Own Manufactured Stone Arch

It’s kind of funny when you think about it. Our earliest ancestors built stone arches and various other architectural elements because stones were plentiful and cheap. Then once we became civilized, stone became more and more expensive until people had to stop using it just because of the high price. Luckily manufactured stone was invented and now we can add a little style and substance to our outdoor projects without breaking the bank.

Before you begin to install your manufactured stone onto your arch you will have to gather a few items.

You will need:

  • Tile sealant
  • Buckets
  • Sponge
  • Grout bag
  • Four inch grinder
  • Chipping hammer
  • Acrylic modified thin set
  • Measuring tape
  • Pencil
  • Pointing trowel
  • Mason’s Trowel
  • Nylon brush
  • Safety goggles
  • Ladder

Once you have everything together you can start going through these steps:

  1. Manufactured Stone Arch | Native Custom StoneLay out all of the manufactured stone pieces under the arch. Check your manufactured stone corner pieces to make sure they have fully dried or “cured”. The corner pieces are always installed before the rest because they act as an anchor for them to tie into.
  2. Mark the center of the arch with a straight line using your pencil. Make sure your first piece is centered on that line and stagger the corner pieces with your first installation piece. Mark an outline of where the piece will go.
  3. Mix the acrylic modified thin set until it is stiff. It should remain sticky and reasonably hard to smear with a trowel. Give the back of the piece a thick coating and make sure it is consistent to fill in gaps. Lightly coat the place where you will be putting the piece for extra adhesion. Take care not to get any of the mixture onto the surface of your manufactured stones.
  4. Using the ladder put the piece into place under the arch. Lean into the piece as you apply it so that your body weight will help hold it in place. Keep pressure on the piece if you need to slide it from side to side so you don’t accidentally drop it. Step back and look at the piece for a few moments to make sure it is not sagging.
  5. Keep going through the 4th step until all the pieces are in place. Start cutting the pieces using a chipping hammer or the 4 inch grinder. Once you are finished you should let the stones sit for about 24 hours.
  6. Get your sponges and nylon brush along with a bucket of water. Start cleaning the pieces but be careful not to accidentally mark the surface. Once the pieces are clean you will have to wait for them to completely dry before continuing.
  7. Use the grout bag to start putting grout into the cracks between the stones. The grout should easily come out of the grout back but be thick enough to adhere to the underside of the arch. Avoid getting grout onto the surface of the stone as much as possible and wipe it off with a wet cloth when you do. Wait for the grout to dry before you start tooling it with trowels. When you have finished, wait 24 more hours before starting the next step.
  8. Seal the stones with masonry or tile sealant. The best way to apply the sealant is with a spray bottle. Keep applying the sealant until the sealant is no longer able to get through to the stone.

Filed Under: Custom Stone Accents, DIY, Maintenance and Installation, Manufactured Stone Tagged With: arch way stone, custom stone veneer, dawsonville ga stone, diy manufactured stone, diy manufactured stone entry, manufactured stone, native custom stone, stone arch

Search This Site

Technical

  • Download Our Brochure
  • Go-Stone Panels
  • CustomFit® Stone Panels
  • Stone Installation
  • Cleaning Instructions
  • Technical Details

Testimonials

We had the complete exterior of our home re-done by Native Custom Stone 2 years ago and are STILL in love with the results!! They took a very plain-looking wooden exterior and made it into something that is striking and eye-catching.

Visit the Showroom

Visits to the Native Custom Stone Showroom are by appointment only. Call (888) 823-0745 today to schedule!
 

Find a Vendor

Filter by

No results found in this location. Please try again.

Get Directions

Add Waypoint
show options hide options
Print directions Reset directions
Fetching directions......
Reset directions
Print directions

Contact Us

Stone Types

  • Castle Rock
  • Country Villa
  • Field Stone
  • Ledge Stone
  • River Rock
  • Rubble Stone
  • Stack Stone

Tech Links

  • CAD & Installation Details
  • BIM | Revit | Autocad
  • Testing & ICC-ESR Report
  • 3-Part Spec & MSDS
  • Product Warranty
  • LEED Details
  • Cleaning Instructions
  • Product Data

Resources

Native Custom Stone Lunch and Learn | Stone Installation Information Download Our Brochure | Native Custom Stone Brochure Download

Contact Info

Native Custom Stone
236 Hightower Parkway
Dawsonville, Ga 30534
Phone: (888) 823-0745
Phone: (706) 216-5545

Follow Us!

Follow Us on FacebookFollow Us on LinkedInFollow Us on Blog

Actual stone colors may appear different in pictures due to pigments and lighting. Native recommends viewing actual samples prior to placing an order.
Website Designed by: Grater Digital |  Sitemap  |  Privacy Policy