• Home
  • Styles
  • Panels
  • Accessories
  • GO-BRICK®
  • Vendors
  • Technical Details
  • Contact
  • Shop
Native Custom Stone

Custom Stone Manufacturer

Questions? Call us at:   (888) 823-0745

  • Home
  • Stone
    • Country VillaCounty Villa Stone
    • Castle RockCastle Rock
    • Rubble StoneRubble Stone
    • Stack StoneStack Stone
    • Ledge Stoneledge stone
    • River Rockriver rock
    • Field Stonefield stone
  • Panels
    • CustomFit PanelsCustom-Fit DIY Stone Panels
    • Go-StoneGo-Stone DIY Stone Panels
    • AccessoriesStone Accessories
  • Brick
  • Find A Vendor
  • Technical
  • Contact
  • Shop
You are here: Home / Archives for Uncategorized

How to Avoid Weather Damage to Manufactured Stone Veneer

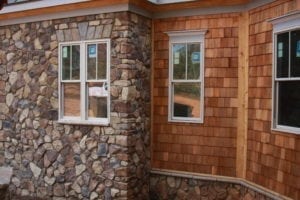
Good quality manufactured stone veneer looks great, lasts a lifetime, and is incredibly easy to maintain. But it must be installed correctly to ensure moisture doesn’t affect it adversely.

Cedar Creek
Cedar Creek Native Custom Stone

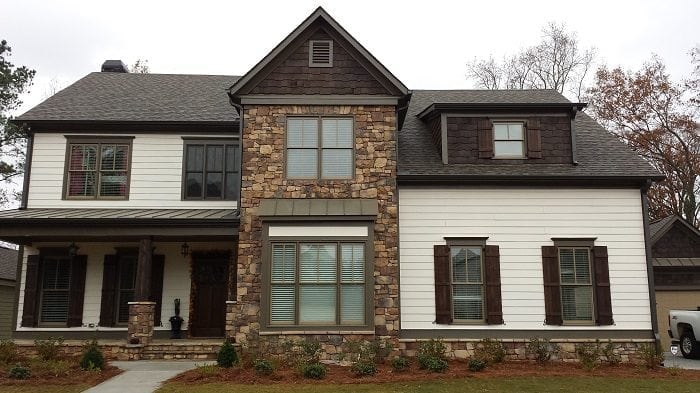
The problem is that most manufactured stone veneer products are porous and so will retain water if they get wet. And if moisture is trapped between the veneer and your drywall or wooden framing it stands a good chance of causing water damage and might even destroy the materials it comes into contact with. Another issue is that you won’t normally be able to see what’s happening behind the manufactured stone. In reality, the veneer will probably continue to look great while the materials behind it deteriorate and may even rot away completely.

What You Need to Know About the Installation of Manufactured Stone Veneer

Unfortunately, the reality is that most manufactured stone products – especially those installed on exterior walls – need to be installed by a professional with the right skills and experience. Enthusiasm is not enough to make a DIY project succeed. For example:

  • Cement-based stone veneer products must be laid on a base or foundation of some kind and the installer will need some building skills to do this. For instance, the right concrete mix must be used and it must be placed correctly and allowed to set for enough time before the veneer is laid.
  • There must be proper drainage away from the base to prevent any water from seeping between the wall of the house and the new veneer, or worse still pooling between the two layers. You might also need weep-holes.
  • Flashing is often installed to lead water away from the wall of the house at the base constructed to support manufactured stone veneer. This must been done properly, preferably by a qualified plumber. The principles are the same as those used for flashing around a chimney that prevents water from seeping into the house. A plumber needs to do this work too.

How to Protect Manufactured Stone Veneer Surfaces

Even when manufactured stone veneer has been correctly installed, it faces the threat of all kinds of weather-related and other damage. These range from water and freeze damage to the accumulation of dirt as well as fungal and algae growth that can stain the surface.

To prevent this, what you need is a product that can be painted onto the surface to repel stains, water, and even oil.

Native Custom Stone, established manufacturers of manufactured stone veneer, has developed a product that does just this. Called Natural Shield, it bonds both mechanically and chemically to a number of substrates including manufactured stone, stucco, brick, paving stones, and even natural stone.

If you are thinking of installing or having manufactured stone veneer installed make sure you take these steps to avoid weather damage to your new wall.

You can also call Native Custom Stone for more information and advice.

Filed Under: Uncategorized

Increasing Your Home’s Curb Appeal With Manufactured Stone

Prestige Brown Ledge

It’s long been acknowledged that curb appeal can increase the value of a home and decrease the time it takes to sell. Curb appeal is simply the art of making a home’s exterior look nice from the street. A few shrubs here, a splash of color there, and your home could be made beautiful in a matter of just days.

For a home that needs a siding update, however, the process for improving curb appeal can be a little more complex. Old or uninspired siding can make a home look forgotten, unkempt, and dirty. Improving siding can boost curb appeal by making the home look newer and more modern. One attractive option that homeowners and sellers turn to is manufactured stone veneer. Here’s what you need to know. 

How Stone Veneer Boosts Curb Appeal

There are many things that stone veener can do to improve the appearance of a home. Stone is a natural product that harkens back to the days when houses were built by hand from the raw materials found in the earth. By grounding the house in natural beauty, and by adding visual interest to the house, stone veneer gives every home a sense of elegance and grace. 

Variety of Texture

Stone comes in a variety of textures, from the round, bold beauty of river rock, to flat, sharp pieces of slate. This variety of texture contrasts nicely against other types of siding, like wood and wood look-alike products.

Stone looks its best when it is able to echo the textures found elsewhere in the environment. Homeowners who wish to link their stone veneer to the other visual elements found in the environment can pave their walkways and even their driveway with similar stone.

Variety of Color

Stone comes in many different colors. Even the same type of stone quarried from the same location will have some variety of color that gives the exterior of the house an ebb and flow. Some types of stone have a wide variety of colors. For example, slate comes in shades of gray, red, green and even blue. 

Variety of stone color can even give homeowners a theme to draw upon when planting flowers and other types of landscaping around their house. Matching the flowers to the stone makes the home seem more visually unified. For homeowners who think this is important, sampling different types of veneer and shopping around for different colors can help. 

Where to Place Stone on Your Home’s Exterior

Stone can be placed in a variety of places on the exterior of the house. A traditional place to position stone on siding is on the lower half of the house, like a knee wall. In cases like this, the stone veneer meets the siding less than half way up the side of the house. 

There are many other places where stone veneer can be found. Another common place to see stone is on the chimney, starting at the foundation and moving all the way up. Sometimes, veneer is found on the exterior accents only, in place of trim around windows and doorways. This helps the doorway and windows stand out, making them pop visually. 

Finally, veneer can be found at the base of many porch columns, where it appears to support the porch, roof, and the weight of the house itself. Using stone veneer in this way gives the home a well-grounded appearance. Stone is strong, mighty, and capable of enduring years of harsh weather. Installing stone veneer in a position where it appears to hold up the house makes the house itself look timeless and as strong as a mountain.   

Which Type of Stone Veneer is Right For You?

When the time comes to pick the right stone for your house, contact a reputable stone veneer vendor who knows how to properly install stone on your home’s siding. Working with a professional helps ensure that your home’s siding will look its best when the time comes to sell your house. 

Lauren Schneider is the owner of militaryhomesearch.com, helping military members and their families navigate the unique challenges they face when buying or selling their homes.

Filed Under: Uncategorized

Architects Value Native Custom Stone Lunch & Learn Sessions

Native Custom Stone (NCS) has been holding lunch and learn sessions for customers for more than a decade and architects love them!

Presentations cover the installation of NCS’s synthetic stone products and they focus on the various processes and technologies, as well as best practices, services, and the latest products offered in this niche industry.

Following a recent lunch and learn presentation covering The Installation of Synthetic Stone, architect Mike Nelson, AIA, LEED AP, NCARB from the Alabama-headquartered RLS Design Group, had this to say:

The presentation was “very informative on materials and methods for synthetic stone with various substrates. I enjoyed the photographs, physical samples, and examples of installation.”

The lunch and learn was presented by Greg Frank, an architectural representative at Native Custom Stone, LLC. Greg, who joined the company in 2013 is in charge of operations and business development.

Nelson said he believed Frank was “a positive asset to Native Custom Stone.” He said “he is very personable, with a great sense of humor and an ever greater wealth of knowledge,” thanking the company for what he ranked as a valuable lunch and learn experience.

The Native Custom Stone Lunch & Learn Experience

NCS launched its lunch and learn presentations in 2009, targeting both existing and potential customers in the East South Central and South Atlantic regions. The motivation was to provide interested parties with the opportunity to get first-hand information about the company’s innovative products and show them how they could be installed and used for both commercial and residential projects.

From the start, architects, developers, and general contractors have been invited to attend these sessions.

Courses are free for American Institute of Architects (AIA) members and those participating in the Continuing Education Unit (CEU) courses. The presentations result in two credits for participants:

  1. One Learning Unit (LU)
  2. One Health and Safety Welfare Unit (HSW)

This fascinating synthetic stone installation course is open to all AIA member regions.

So, if you or members of your staff want to know more about the differences in installation techniques for synthetic and natural stone, and gain a thorough understanding about the installation practices required for synthetic stone structures utilizing rigid insulation, this is a presentation you shouldn’t miss. It also offers information about the very best options for water barrier systems that are best suited for synthetic stone installations.

Please contact us for more information.

Filed Under: Uncategorized

Get a Facebrick Wall Installed in a Day – Ask for Go-Brick

Facebrick walls add style and a certain sophistication to homes, particular interior feature walls. But if you haven’t built your house with facebricks, how will you introduce this look without having new walls built?

One solution is to clad the wall using facebrick. This can work, but the downside is that it’s messy and if used inside, the thickness of the bricks will make the room just a little smaller. Alternatively, you can use cladding made from fines concrete (made in a mold without the addition of coarse stone). Or you can ask your contractor to use Go-Brick from Native Custom Stone.

The Go-Brick Advantage

Go-Brick is light, thin, and quick and easy to install, and it is cost effective. It can be used inside or on the exterior of homes with minimal mess.

Created by molding the surface finish of hand-selected facebricks, Go-Brick veneer can be installed with different grout effects, deep raked, full brushed, and full tooled. It’s available in a number of popular colors including reds and autumn shades, with each tumbled brick measuring about 2¼ x 75/8.  Blending bricks from different boxes ensures a more natural look because colors do vary a little from batch to batch.

A total of 58 brick flats is packaged in each box. This is enough to cover an area of 8½ square feet with 3/8-inch mortar joints. Corner pieces and windowsills are also available to ensure that every job can be done neatly, with meticulous attention to detail. The veneer is so realistic it will look like the real thing.

Installation of Go-Brick

Installation of Go-Brick is super-easy for anyone with basic building skills. Contractors will be able to do most installations in less than a day, including preparation and clean up.

The finished surface of interior walls can be left as is. Outside walls should be sealed with Native Custom Stone’s Natural Shield Sealer. It will last for a good three to five years and offers excellent protection from water. It will also repel oil.

For more information contact Native Custom Stone today.

Filed Under: Uncategorized

Installing Go-Stone Panels Step-by-Step

Whether you are going to install your own faux stone Go-Stone Panels or get a contractor to do it for you, the process is quick, clean, and very simple.

Native Custom Stone packages its lightweight simulated stone units in easy-to-transport, easy-to-store boxes. Each box contains five different panels that will produce a finished veneer of 5 square feet with a total finished edge of 40 vertical inches. Corner pieces are available separately, and these are also neatly packed in boxes with enough to cover 4 linear feet. Additionally, accessory items including surrounds for plugs and switches are available to ensure a professional finish.

The builder’s toolkit for installing Go-Stone panels is basic, and all professional contractors and DIY enthusiasts will be sure to have all the items. These are a:

  • 12 inch torpedo level or a longer spirit level
  • ¼ inch notched trowel for applying the adhesive
  • drywall or wet-cut saw to cut panels if required
  • measuring tape

The only other equipment required is ceramic tile and stone adhesive and of course as many Go-Stone panels required to cover the surface that is going to be revamped.

Step-by-Step Installation of Go-Stone Panels

Step 1: Preparation

  1. Use a cloth, or old sheet or blanket to cover the floor adjacent to the wall to be worked on.
  2. Clean the wall surface with a damp cloth or sponge and then allow to air dry without wiping.

Step 2: Installing the Go-Stone Panels

There are three different sized panels in each box. These should be randomly mixed to ensure a natural look. If there are corners, installation should start at a corner with corner pieces.

  1. Apply adhesive to the back of the first panel with the notched trowel
  2. Working from the floor up, set the first panel in place and move from side to side until it stays against the surface. Use the torpedo or spirit level to check that the upper horizontal surface of the panel is level.
  3. Place the second panel flush up against the side of the first panel. Make sure it isn’t the same design as the one below. So if the first panel was 12 inches long, the next should be either 8 inches or 16 inches.
  4. Use the level again to ensure both are in a straight line.
  5. Continue along the floor line staggering pieces so that the seam line isn’t in one vertical line. Also continue to check the upper horizontal level. Never rely on an existing surface because it may not be completely level.
  6. It is very likely panels will need to be cut to fit most walls exactly. Cut individual panels only when required. Ensure that cut edges meet within the wall area or where the wall meets another wall. Factory-finished edges should be used where these will be visible. If the veneer is to extend around a corner, corner pieces should be used.
  7. As work progresses it will only be necessary to double-check levels now and then.
  8. All that will be left to do is clean up.

While Go-Stone surfaces do not need to be sealed, Native Custom Stone has a Natural Shield product that can be used, especially if the wall is open to the elements.

For more information, contact us today.

Filed Under: Uncategorized

Define Your Interior With a Faux Stone Makeover

Stone-clad walls add elegance, timeless textures, and natural style to any house. Instead of flat, painted surfaces, or even wood, stone can add a completely new dimension and feeling of excitement to an interior. Of course, the style of your home will determine the exact finish you choose, but there are so many possibilities, you will be spoilt for choice.

But when you decide that stone is the look that you like, you will need to decide whether to use natural stone or a faux product. And frankly, unless your house was built out of stone, this is a no-brainer.

There is absolutely no point in using natural stone to clad walls built using other materials. Rather, stone veneer, which comes in a number of different guises, is a much easier route to take. And provided you use a proven product, your final result will look just like the real thing – maybe even better.

Real Stone Versus Manufactured Products

While stone is one of the oldest building materials used by man, it is heavy and difficult to work with. Stonemasons spend years learning the craft and developing the skills required to cut and lay stone.

Stone veneers, on the other hand, are relatively lightweight and only need very basic building skills to install. They were developed to fill a gap in the market for those who want a stone-look product that is cheaper and easier to lay than natural stone.

Also, certain types of stone occur naturally in different regions, generally limiting choice. Manufactured or faux stone, on the other hand, is created in imitation of every possible type of stone, from river rocks and traditional US ashlar used for building walls to slate and limestone, or sandstone used to build ancient castles.

Faux stone products are also available in a wide color palette to suit any interior décor scheme and in many different styles. For instance, you can create an interior wall that looks as if the stone was dry stacked, or you can achieve a more modern effect by using a veneer that incorporates a mortar joint.

Whether you choose stone veneer or stone panels made from recycled materials, Native Custom Stone has a range of options that you can use to transform the interior of your home. Visually they all look different, but what they have in common is ease of installation.

Whichever product you choose you can effectively define your interior with a faux stone makeover that is, quite literally, “cast in stone.”

If you like to know more about the products Native Custom Stone has on offer please contact us. Alternatively you can order online from Build Direct or Home Depot.

Filed Under: Uncategorized

Why Architects Prefer Native Custom Stone

Architects designing new homes or drawing plans for extensions and major renovations often specify faux stone or manufactured brick veneer from Native Custom Stone.

ROIThe company’s manufactured faux stone and brick veneer products – Go-Stone and Go-Brick – have numerous benefits over heavy natural stone and bricks that must be laid on a concrete foundation using mortar.

Molded in imitation of the real thing, both products are sold in panel form and can be installed quickly and easily with no special building skills.

Benefits architects recognize include:

  • Weight: Go-Stone and Go-Brick are lightweight and easy to handle.
  • Cost: The cost is much less when compared to solid stone and bricks and mortar.
  • Availability: A comprehensive range of brick and stone types is available, irrespective of what is normally found locally. Products may even be ordered online and delivered right to your doorstep.
  • Installation: Installing Native Custom Stone’s faux stone and brick veneer products are so simple you can do-it-yourself, or employ unskilled people to do it for you. An architect who understands the system can oversee unskilled labor, rather than utilizing a professional team of builders. All you (or they) need is regular tile adhesive and very basic building tools including a notched trowel, spirit or torpedo level, and a measuring tape.
  • Maintenance: Costs associated with maintenance are reduced, which will be a benefit that is likely to appeal to any architect’s clients. Whereas most other surfaces require regular staining, painting, and/or sealing, if Go-Stone and Go-Brick are installed indoors they don’t require any maintenance other than cleaning. Exterior surfaces should though be sealed for longevity.

Another reason architects prefer Native Custom Stone products rather than solid stone or bricks and mortar are that they can be used inside and outside, and on feature walls or throughout the entire house. This makes design creativity a cinch. Better still, the company will custom color products if required, giving architects an extra edge.

Native Custom Stone’s most innovative product is Go-Stone, which is made primarily from discarded vehicle tires using crumb rubber technology. Go-Brick, on the other hand, is a tumbled brick product, but equally thin and easy to work with. Both are available from Build Direct or Home Depot.

In addition to the Go-Brick and Go-Stone panels produced by Native Custom Stone, the company also manufactures faux stone molded using a fine-aggregate concrete.

For more information, you can contact Native Custom Stone directly, by phone or email.

Filed Under: Uncategorized

Save Time and Money With a GoBrick Accent Wall

If you’re thinking of a quick, relatively inexpensive makeover that will transform your home then Native Custom Stone’s exclusive GoBrick veneer is a fantastic option. It’s lightweight, easy to install, and it looks like the real thing. Better still, you will save time and money when you work with GoBrick.

So where would you use a GoBrick Veneer in your home?

Suitable Walls for GoBrick

Bricks and mortar have been used to build walls for thousands of years – and for every possible type of structure. So wherever it might have been used for building would be a suitable option for cladding the surface with GoBrick veneer.

The beauty of GoBrick is that it can be used to clad one single wall to make it a feature, or an entire room. It can also be used for exterior walls, provided the surface is properly sealed to protect it from exposure to water, frost, and snow.

Benefits of GoBrick versus Real Bricks and Mortar

Having said that GoBrick will save you time and money, you’re probably wondering how this can be possible. Here’s how!

  1. Bricks are heavy, even if you lift them one by one. GoBrick veneer is manufactured in panels and they weigh very little.
  2. Bricks have to be laid correctly using the right tools. GoBrick requires minimal tools for installation and no special bricklaying skills.
  3. Brick walls must be laid on a concrete foundation to carry the weight. GoBrick doesn’t require any form of foundation.
  4. Bricks must be laid using mortar to bond them together. GoBrick panels are installed using ordinary tile adhesive.
  5. Bricks are considerably more expensive than GoBrick.
  6. Generally, bricklayers work with a team. GoBrick panels can be installed quickly and easily by one person working on their own.

How GoBrick is Made

A revolutionary product developed and produced by Native Custom Stone, GoBrick is made in a mold taken from individual bricks chosen for style and appearance. Designed with DIY enthusiasts in mind, it is produced in a number of different typical brick colors with a range of different types of joint: deep raked, full tooled, and full brushed.

Each panel measures approximately 2¼ x 75/8 and weighs four to six pounds per square foot. Each box contains 58 panels and weight about 24 pounds. Corner pieces and window sill sections are also available.

Installing GoBrick Panels

The only real challenge when working with GoBrick is to ensure that it is installed level, in a horizontal position. This is easy using a chalk line and/or a spirit or torpedo level.

If you would like to do a home improvement project using GoBrick you can order online from Build Direct or Home Depot. You can also contact Native Custom Stone for more information.

Filed Under: Uncategorized

Update Your Home With GoBrick by Native Custom Stone

There’s nothing like a home makeover that is quick, simple, and yet results in a beautiful transformation.

While you can change a color scheme with paint and new soft furnishings like curtains and cushions, Native Custom Stone’s Go-Brick veneer can change the look of your home so dramatically you’ll have friends and family gasping in admiration. Better still, the system is so simple any confident home handyman or DIY enthusiast can do it single-handed.

What is GoBrick?

An ingenious faux brick product, GoBrick is a lightweight veneer that is manufactured in the form of half-inch thick panels. Instead of laying clay or concrete bricks on a concrete foundation using mortar, GoBrick panels are installed using ordinary tile adhesive to apply them directly to the wall they are going to cover. As long as the surface is vertical, you can use the product. No foundation, no skills, and minimal mess!

Suitable for interior and exterior walls, GoBrick can be used to transform an entire building, or as a tool to metamorphose a room, either in its entirety or by introducing a feature wall.

The product is available in a number of guises that mimic the appearance of bricks and mortar and the different ways they are laid.

  • There are several standard colors including Antique Red, Schoolhouse Red, Sunset Rust, Orchard Blend, Old Dixie Grey, Vintage Atlanta, and Savannah Beach.
  • While the joint width for all colors is 3/8 inch, the joint depth varies and is available in imitation of different finishes: deep raked, full tooled, and full brushed.
  • Several mortar-joint colors are available too: Natural Off-White, and Natural Grey, as well as various complementary colors.

Since GoBrick is such a popular product for updating the interior of homes, Native Custom Stone also produces corner panels, faux brick sills, and accessories manufactured for use around electric plug points, light switches, and so on.

Panels are 2¼ inches high and 75/8 inches long and each panel weighs between four and six lbs. They are packaged flat with 58 panels in each box, and each box weighs about 24 lbs.

Installing GoBrick

Minimal tools are required to install GoBrick. A chalk line and/or spirit level, or a shorter torpedo level, are invaluable tools for keeping the panels straight and level. You will also need a measuring tape, preferably a retractable steel tape, and a notched trowel to apply tile adhesive.

The panels don’t have to be sealed if installed indoors but should be sealed if used to transform exterior walls. Native Custom Stone offers Natural Shield Sealer that has a three- to five-year lifespan.

If you’d like to update your home with GoBrick, contact Native Custom Stone or order online from Home Depot or Build Direct.

Filed Under: Uncategorized

DIY Update For Your Fireplace for Winter With Go-Stone or Go-Brick

As the winter weather intensifies, it’s a no-brainer that most of us are going to be spending a great deal of our time indoors. If you are lucky enough to have a fireplace in your living room, there’s a good chance that it’s going to become the hub of your home. The question is, how inviting is this part of your home? Or is it crying out for a little TLC?

If your fireplace is looking drab and/or neglected and is less than inviting, now’s an excellent time to do a quick makeover that will transform it in just a few hours.

DIY Stone Fireplace with Go-Stone or Go-Brick

12742816_10153441029693927_4455248229161191397_nAs the year draws to a close, there’s not much time to call in professionals for home improvement projects. So if your fireplace is in need of an update, you’ll likely be looking for a DIY possibility that you can handle yourself.

We have just the one for you!

Go-Stone and Go-Brick are innovative DIY products manufactured by Native Custom Stone that will enable anyone with minimal building skills to create a little magic before Christmas. Made in the same way to simulate stone and brick respectively, Go-Stone and Go-Brick are lightweight veneer products that are easily installed onto existing wall surfaces, including the front of fireplaces and their adjacent walls.

The installation method is quick and easy, and it utilizes minimal tools, most of which you probably already own. The veneer itself is available online from BuildDirect.com and from a number of Home Depot stores.

What You Need to Update Your Fireplace for Winter

Once you have worked out the surface area to be transformed, you can order your faux stone or bricks. The product will be supplied in boxes.

Additionally, you will need ordinary tile adhesive and grout. The only tools you need are a:

  • measuring tape to check distances
  • torpedo or spirit level to keep the veneer panels straight and level
  • drywall or wet-cut saw to cut ends to size if necessary
  • notched trowel to apply the tile adhesive
  • grout applicator for the grouting; if regular mortar is used you’ll need a pointing tool

Go-Stone and Go-Brick are installed in exactly the same way, and no form of foundation is required. Even if you’ve never done a DIY project before, you really will be able to update your fireplace in just a few hours.

Contact Native Custom Stone or one of our authorized dealers for more information.

Filed Under: Uncategorized

  • 1
  • 2
  • Next Page »

Cart

Find a Vendor

Filter by

No results found in this location. Please try again.

Get Directions

Add Waypoint
show options hide options
Print directions Reset directions
Fetching directions......
Reset directions
Print directions

Contact Us

Stone Types

  • Castle Rock
  • Country Villa
  • Field Stone
  • Ledge Stone
  • River Rock
  • Rubble Stone
  • Stack Stone

Tech Links

  • CAD & Installation Details
  • BIM | Revit | Autocad
  • Testing & ICC-ESR Report
  • 3-Part Spec & MSDS
  • Product Warranty
  • LEED Details
  • Cleaning Instructions
  • Product Data

Resources

Native Custom Stone Lunch and Learn | Stone Installation Information Download Our Brochure | Native Custom Stone Brochure Download

Contact Info

Native Custom Stone
236 Hightower Parkway
Dawsonville, Ga 30534
Phone: (888) 823-0745
Phone: (706) 216-5545

Follow Us!

Follow Us on FacebookFollow Us on LinkedInFollow Us on Blog

Native Custom Stone, 236 Hightower Parkway, Dawsonville, Georgia 30534
Website Designed by: Interactive Search Marketing |  Sitemap  |  Privacy Policy