• Home
  • Styles
  • Panels
  • Accessories
  • GO-BRICK®
  • Vendors
  • Technical Details
  • Contact
  • Shop
Native Custom Stone

Custom Stone Manufacturer

Questions? Call us at:   (888) 823-0745

  • Home
  • Stone
    • Country VillaCounty Villa Stone
    • Castle RockCastle Rock
    • Rubble StoneRubble Stone
    • Stack StoneStack Stone
    • Ledge Stoneledge stone
    • River Rockriver rock
    • Field Stonefield stone
  • Panels
    • CustomFit PanelsCustom-Fit DIY Stone Panels
    • Go-StoneGo-Stone DIY Stone Panels
    • AccessoriesStone Accessories
  • Brick
  • Find A Vendor
  • Technical
  • Contact
  • Shop
Home » Tips and Tricks

Can I Build a Stone Wall Without a Concrete Base for Support?

Stone is a heavy, labor-intensive material that was commonly used for building centuries ago because it was so cheap. That was in the days before anyone ever dreamed of the day when simulated stone would be an alternative option.

Mojave Ledge Sitting Wall

Today, building with stone is a very expensive option that generally requires the services of a skilled stonemason.

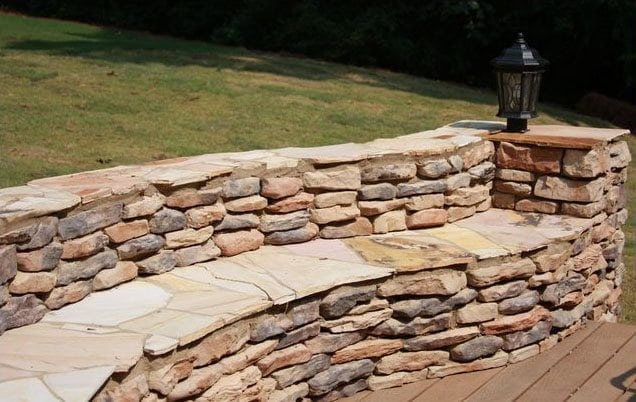
While dry stone walls built outdoors don’t require a concrete foundation of any kind for support, the wall itself needs to have a wide base. As building progresses, the width of the wall decreases so that the finished structure has sloping walls. Whilst this type of structure is not suitable for the walls of a building, it could be used for a perimeter or garden wall.

A structural wall built with natural stone should be built on a solid concrete foundation designed to take the weight of the wall. The mass of the planned structure will be spread over the width of its foundation, in this way distributing the mass over a greater area. The actual size and design of the concrete foundation will, therefore, depend on the size and design of the house. Additionally, the load-bearing capacity of the soil will also be a factor.

While people do still build with stone, veneer, that is laid against a wood- or metal-framed wall is a cheaper, more viable option. But if natural stone is used, a concrete base will be needed, as will the services of a stonemason.

If a synthetic stone veneer is used, there is normally no need for special concrete foundations, irrespective of whether the simulated material is used on interior or exterior walls.

Stone Walls That Don’t Require a Concrete Base for Support

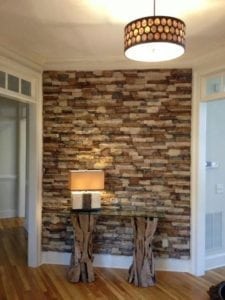
Native Custom Stone (NCS) produces a variety of stone veneer products, none of which require a concrete base or foundation for support. This is because the products weigh much less than natural stone or even manmade bricks and blocks.

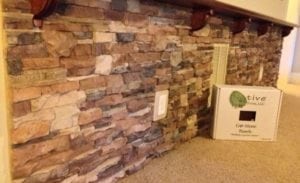
Even the innovative, panelized Go-Stone veneer and interlocking Custom-Fit stone panels are simply applied to any surface that is structurally sound and clean. Absolutely no special foundations or structural alterations are necessary.

While standard manufactured stone veneer and Custom-Fit panels are installed using mortar, Go-Stone, which is made from mostly recycled products including old rubber tires, is installed using regular ceramic tile and stone adhesive. 

Native Custom Stone specializes in simulated stone veneer products including faux stone panels. These products are available from NCS, Build Direct, or from Home Depot online.

Filed Under: Maintenance and Installation, Manufactured Stone, Tips and Tricks

Top Tips and Tricks for Successful Go-Stone Panel Installation

Go-Stone manufactured stone veneer panels have opened up new possibilities for DIY enthusiasts who really do want to do home improvement projects themselves.

Available from a number of Home Depot stores, or online from BuildDirect.com, Go-Stone panels are lightweight, incredibly easy to install, and they look just like natural stone. Better still, they are made from 87 percent eco-friendly recycled materials – mostly discarded rubber tires that would otherwise end up in landfill. You don’t need any masonry or building experience to install these innovative panels, and hardly any tools.

Go-Stone manufactured stone veneer panels are available in three different colors, named according to look:

  1. Cedar Creek
  2. Coastal Blend
  3. Cherokee

The results produce a realistic stone finish and will be sure to add a warm, upscale look to any interior.

So what tips and tricks do you need to know to successfully install Go-Stone panels?

Make Sure You Have the Right Tools and Materials for the Job

If you have done any DIY home projects, chances are you will already have all the tools needed to install Native Custom Stone Go-Stone panels. But be sure to do a check before you start.

You will need a:

  • measuring tape and a pencil
  • spirit or torpedo level (a 12” is perfect)
  • notched floor trowel (a ¼” will do the job well)
  • drywall, wet-cut saw, or an angle grinder
  • rosin paper to protect the floor and painter’s tape to keep it in place (you could also use an old sheet or plastic)
  • personal safety equipment including eye and ear protection for when you cut panels to size

Of course you will also need Go-Stone panels and a suitable tile and stone adhesive to stick them to the walls.

While Go-Stone panels are primarily intended for indoor use, they can be used in some outdoor environments, for instance on the wall of a covered patio that is attached to the house. In this case, it’s important to use a suitable exterior adhesive to install the panels, and it’s best to seal the surface of the panels as well.

Tips and Tricks for Successful Installation of Go-Stone Panels

Go-Stone accent wallInstallation of Go-Stone manufactured stone veneer is so simple anyone can do it without learning any special skills. The only building principle you need to be aware of is the need to keep the top of the panels level.

Before you start work, make sure you have everything you need, and cover the floor surface adjacent to the wall to be clad with rosin paper or an old sheet. Then wipe the wall down thoroughly with a damp cloth to get rid of dust and dirt. If there is grease or grime on the surface, it must be removed. Allow the surface to dry thoroughly before you start laying the panels.

Start laying your panels from an edge. Apply the adhesive to the back of the first panel using a notched trowel. Push the panel into place and move gently from side to side to get rid of any trapped air. Use your level to check that the top of the panel is level. This means it should be parallel with the floor, unless the floor isn’t completely flat and level, which does happen! If you haven’t used a level before, all you do is place it on the upper horizontal edge of the panel and look at the bubble in the vial set in the center of the level. It should be right in the middle, and perfectly balanced. If it isn’t, shift the panel slightly until it is.

Each package of Go-Stone panels has three different sizes, and these should be alternated both vertically and horizontally, as you lay each course. To ensure a totally realistic stone appearance, you need to avoid creating the appearance of seams, or using identical panels next to each other. Keep checking your horizontal levels regularly – at least check after laying every third panel.

When you get to the end of the first row, you might have to cut the last panel to fit the space left. Measure the space and mark this dimension on a panel so that you can cut it accurately. Don’t forget to wear eye and ear protection when using cutting tools.

If you are using corner pieces, install these before cutting panels to fit the space at the end of a row.

How to Work Out How Many Go-Stone Panels You Need

Native Custom Stone’s Go-Stone panels contain five pieces of three different sized panels – 15 in all. The sizes are 8” x 4”, 12“ x 4”, and 16” x 4“, so that each course will be four inches high. The ends of the two longer panels, and one end of the shorter one, have notches that allow the next panel to slot in neatly. Each box contains sufficient panels to cover 5 ft2, with a total of 40 vertical inches of flat, finished edges.

Corner pieces are packaged separately, with four linear feet in each box.

Go-Stone also supplies accessory pieces, including electrical surrounds for light switches, separately, to ensure a professional finish for every project.

Filed Under: Go-Stone Panels, Tips and Tricks

How to Install DIY Stone Panels (Go-Stone) the Easy Way

DIY home improvement projects can be challenging, rewarding, and if you can do relatively simple makeovers easily and quickly, they can be a lot of fun too.

The use of faux stone as cladding inside the house is one of the most effective makeover ideas. You can use it on feature walls in living areas; between counters and cupboards to transform kitchens; as a backdrop for fireplaces, bars and other special areas; and to add character to stairwells, lobbies and entrance halls, however big or small they may be.

But until relatively recently, working with faux stone has required basic masonry skills because it was molded from concrete and laid using mortar. Doing it this way is incredibly effective, but does take time, and can be messy.

DIY stone panels (Go-Stone) are just as effective, but quite different. A truly DIY product launched by Native Custom Stone in 2013, Go-Stone panels are made with recycled tires, making them lightweight and environmentally friendly. They are also incredibly easy to install with no formal skills, and it’ll take you about a fraction of the time it would to install traditional faux stone panels.

DIY stone panels (Go-Stone) can be used in a multitude of different ways, to create lots of different effects, but the installation process remains the same – and the bonus is that anyone can do it!

The Installation Process for DIY Stone Panels (Go-Stone)

Easy to Install Go-Stone DIY Project The first step is to measure the surfaces you are planning to transform using DIY stone panels (Go-Stone). The next is to order what you need from Native Custom Stone, select Home Depot stores, or from BuildDirect.com

There will be three different sized panels in each pack; these measure 16, 12 and 8 inches. They should be alternated according to the illustration on the packaging, for example, with a 12- or 8-inch panel above a 16-inch panel. Note that corner pieces are packaged separately. You will need these if you are working on pillars or any areas that don’t end at the corner of a wall.

The second step is to ensure that you have everything you need to do the installation work.

There are so few tools and equipment needed, if you’re already into DIY there’s an excellent chance you will have it all already. You’ll need:

  • Measuring tape to measure the surfaces as well as to check where the panels will go.
  • Drywall or wet-cut saw to cut some of the panels to ensure end pieces fit perfectly.
  • Torpedo or spirit level to make sure the panels are level and plumb.
  • Notched floor trowel.
  • Ceramic tile and stone adhesive, preferably ready mixed.

Now you’re ready to get started.

  1. Make sure the surface to be clad is clean and dry.
  2. Cover the floor in and around the work area with canvas tarpaulin or plastic sheeting.
  3. If you have corner pieces, it’s important to start working from a corner.
  4. Apply adhesive to the first panel using the trowel. Make sure it covers the whole surface.
  5. Push the first panel firmly into place and use the level to make sure it really is level. Never rely on existing surfaces for this – not even the existing floor.
  6. Lay all the panels along the baseline.
  7. You may have to cut the last panel to fit. If you have corners at both ends, you will have a cut panel in the middle, in which case it’s best to cut two of the panels and butt them together for a neat fit.
  8. When you lay the second row of panels, make sure you don’t lay identical ones on top of one another. If you do this you are likely to create a visual seam.
  9. Continue to check your levels as you work.
  10. And that’s all there is to it. Simply keep laying your new simulated stone cladding until you’re done.

Contact Native Custom Stone for more information about the different stone types and colors for your next project using DIY stone panels (Go-Stone).

Filed Under: DIY, Go-Stone Panels, Tips and Tricks

Get Your Home Ready for Winter with These Maintenance Tips

If you haven’t got your home ready for winter yet, there is still time to do some maintenance to protect your home from the freezing conditions predicted from late December.

home maintenance fallIn Georgia the snowiest periods are likely to be mid to late December, and then more snow is predicted for early February. Most of January is also likely to be icy cold.

Ice, snow, and wind can all cause damage, but if you are prepared, by taking steps to minimize possible damage, you won’t face the possible prospect of dealing with winter-related disasters. Apart from anything else, if maintenance is found to be lacking, there’s a good chance that any insurance claims you make will be rejected.

Maintenance Tips for the Outside of Your Home

Essential winter-proofing maintenance includes cleaning and clearing gutters, trimming dead branches from trees, repairing damaged steps and handrails, sealing holes and cracks in foundations and walls, and coating manufactured stone surfaces to protect them from the elements.

  • Clean gutters It is really important to ensure all gutters are clean and not blocked with sticks, dead leaves, and other wind-borne debris. If not, rain, and melting ice and snow will dam up because the water has nowhere to drain away. This can cause water to seep into the house and damage walls and ceilings. You might also consider fitting gutter guards to stop debris getting into the gutters in the first place. Ultimately, you need to make sure that water runs freely through gutters and downpipes.
  • Trim trees This is not the time to be landscaping, but if there are dead branches or trees that could break in strong winds, cut them off or trim them back. If they do break, they could damage vehicles, walls, your home itself, or even hurt people who may be on our near your property.
  • Repair steps and rails If any part of a stairway is broken or showing signs of rot it must be repaired. You don’t want people falling and risking injury. Remember too that in any case, ice and water make steps more treacherous so it’s important to make them as safe as possible.
  • Seal holes and cracks Check all exterior walls and visible parts of foundation footings for cracks. If you find damage, fix it or call in a contractor to do it for you. Also check around skylights and other openings in the roof (if there are any) and seal these too. Protect exterior water pipes with caulking. Also check roof tiles because if these are broken or missing, you’re asking for water damage to occur during winter storms.
  • Protect manufactured stone, brick and stucco surfaces A good quality concrete and masonry sealer like Natural Shield from Native Custom Stone should be used to protect natural and manufactured stone surfaces as well as pavers, stucco, and any exterior brickwork. Natural Shield is ideal for achieving the level of water repellency required to prevent freeze and thaw damage, as well as to reduce the risks of unwanted stains, cracking, biological growth, chalky efflorescence and any form of chemical degradation. So seal now to prevent water from penetrating your home this winter.

Maintenance Tips for the Inside of Your Home

You want to be warm throughout winter, no matter how cold it gets outside. There are several maintenance tips for achieving a warm interior, ranging from servicing your heating system to ensuring there is adequate insulation, not only in the house itself, but in basements, attics, lofts and crawl spaces as well. Other elements to consider include pipes and plumbing, as well as fire and smoke alarms.

  • Keep the interior of your home warm If you haven’t had the heating system in your home serviced recently, do it now. As a rule of thumb, these systems should be serviced at least once a year to prevent smoke or fire damage. Boilers should also be serviced, and if radiators are colder at the top they usually need bleeding, which releases any trapped air. Also make sure that thermostats are set at 65 °F (about 18 °C) to prevent pipes from freezing.
  • Add insulation A properly insulated house will help to reduce heat loss in winter, not only keeping you warm, but also conserving energy and in this way cutting bills. This includes walls, ceilings, water tanks and pipes. Well-insulated crawl spaces and basements will also keep pipes from freezing when temperatures drop dramatically. Also be sure that there is adequate insulation in the loft or attic roof (if there is one) because heat from an inadequately insulated attic often causes ice and snow to melt. Then if it re-freezes this could add to a build-up that might eventually cause the roof to collapse. Rather be safe than sorry and spend a bit on additional insulation.
  • Pipes and plumbing Check pipes for cracks and leaks and fix them or call in a qualified plumber to do it for you. Also make sure you know where all pipes are located and where to shut off the water if the pipes do freeze. If you don’t you might end up with burst pipes. Consider installing an emergency pressure release valve as a precaution against the damage an increase in pressure can have if pipes freeze.
  • Smoke and fire alarms Check that these are working properly. If they aren’t, have them repaired as a matter or urgency. It is also a good idea to install a carbon dioxide detector because a well-sealed home has the potential to trap toxic gas from fires.

Forewarned is forearmed, so do yourself a favor and do some basic maintenance both inside and outside before it’s too late.

Filed Under: Tips and Tricks Tagged With: fall, home, maintenance, tips

Cart

Visit the Showroom

Visits to the Native Custom Stone Showroom are by appointment only. Call (888) 823-0745 today to schedule!
 

Find a Vendor

Filter by

No results found in this location. Please try again.

Get Directions

Add Waypoint
show options hide options
Print directions Reset directions
Fetching directions......
Reset directions
Print directions

Contact Us

Stone Types

  • Castle Rock
  • Country Villa
  • Field Stone
  • Ledge Stone
  • River Rock
  • Rubble Stone
  • Stack Stone

Tech Links

  • CAD & Installation Details
  • BIM | Revit | Autocad
  • Testing & ICC-ESR Report
  • 3-Part Spec & MSDS
  • Product Warranty
  • LEED Details
  • Cleaning Instructions
  • Product Data

Resources

Native Custom Stone Lunch and Learn | Stone Installation Information Download Our Brochure | Native Custom Stone Brochure Download

Contact Info

Native Custom Stone
236 Hightower Parkway
Dawsonville, Ga 30534
Phone: (888) 823-0745
Phone: (706) 216-5545

Follow Us!

Follow Us on FacebookFollow Us on LinkedInFollow Us on Blog

Actual stone colors may appear different in pictures due to pigments and lighting. Native recommends viewing actual samples prior to placing an order.
Website Designed by: Grater Digital |  Sitemap  |  Privacy Policy