• Home
  • Styles
  • Panels
  • Accessories
  • GO-BRICK®
  • Vendors
  • Technical Details
  • Contact
  • Shop
Native Custom Stone

Custom Stone Manufacturer

Questions? Call us at:   (888) 823-0745

  • Home
  • Stone
    • Country VillaCounty Villa Stone
    • Castle RockCastle Rock
    • Rubble StoneRubble Stone
    • Stack StoneStack Stone
    • Ledge Stoneledge stone
    • River Rockriver rock
    • Field Stonefield stone
  • Panels
    • CustomFit PanelsCustom-Fit DIY Stone Panels
    • Go-StoneGo-Stone DIY Stone Panels
    • AccessoriesStone Accessories
  • Brick
  • Find A Vendor
  • Technical
  • Contact
  • Shop
Home » Maintenance and Installation » DIY » Page 2

A Complete Guide to Caring for Your Interior and Exterior Manufactured Stone Veneers

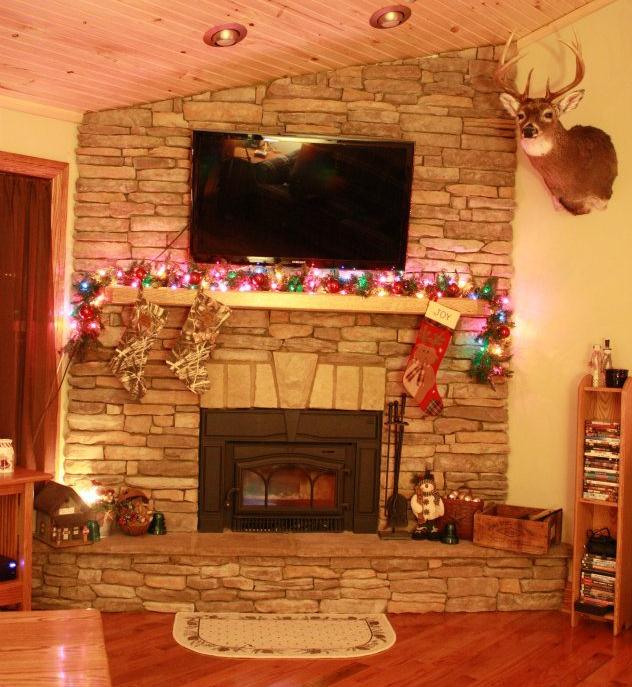
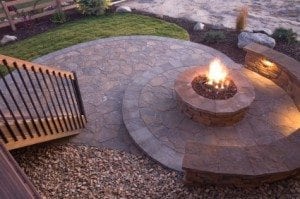
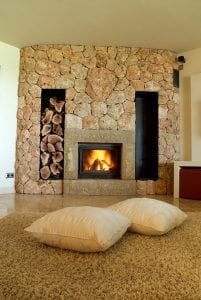
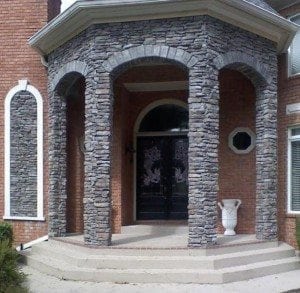
Manufactured stone and products like Go-Stone are rapidly growing in popularity, especially with DIY’ers. Manufactured stone is extremely easy to work with, and it looks indistinguishable from natural stone. It is sometimes called cast stone because  it’s fabricated using casts made from natural stone and concrete. It is often used for architectural features like:

  • Building facings
  • Ornamentation
  • Trim
  • Garden ornaments

Why do more and more people use manufactured stone every day?

go-stone-gallery-16
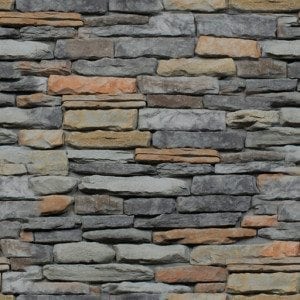
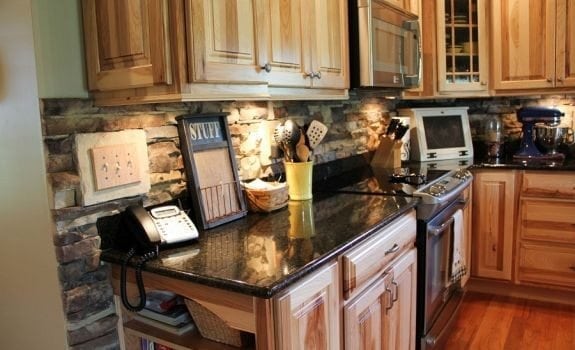
Manufactured stone veneers have the look of expensive natural stone without all of the downsides. Manufactured stone is durable and can last just as long as natural stone but it:

  1. Costs much less than natural stone. The price of natural stone has become artificially inflated over time because it is now associated with wealth and elegance. Manufactured stone can give you the same look and feel of natural stone, but it only costs a fraction of the price.
  2. Is much easier to work with. Manufactured stone is much easier to move around and install because it doesn’t weigh nearly as much as a natural stone. That means you don’t need extra materials to support it or expensive tools to cut it. Plus, it drastically lowers the chance you will be injured by it so you can save on doctor bills as well.
  3. Manufactured stone comes in a wide selection of colors and types . One of the biggest drawbacks to using the natural stone is its weight. It costs so much to ship it that most people will only be able to afford the stone quarried locally. Manufactured stone can look exactly like rocks mined from the heart of Siberia and it won’t cost you more than any other style.

Is manufactured stone vulnerable to damage or decay?

No, it is extremely durable and resistant to damage from the elements just like natural stone but your home isn’t. If a professional doesn’t install the manufactured stone, then you could have trouble with water pooling or draining towards your foundation instead of away. This problem can snowball fairly quick because you won’t be able to see the state of the  wood behind your beautiful, pristine manufactured stone.

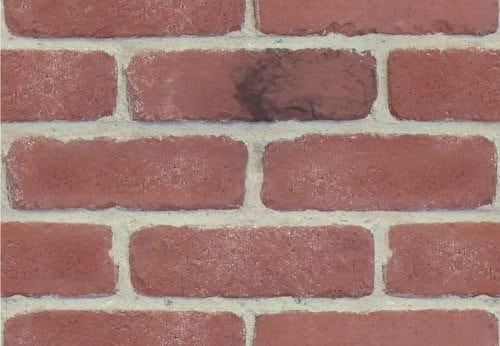
To ensure your new manufactured stone wall doesn’t cause you costly problems in the future, you will need to seal it against water. The experts at Native Custom Stone have found that Natural Shield is a perfect choice for the job. It works on:

  • Manufactured Stone
  • Brick
  • Pavers
  • Stucco
  • Natural Stone

Natural Shield will protect your manufactured stone from freeze damage, stains, biological growth, water damage, cracking and dirt accumulation.

What to do if your manufactured stone has a few stains

Manufactured Stone Veneer | Custom Stone | MortarManufactured stone is nearly maintenance free, but the operative word is “Nearly”. Every two or three months you should give your veneer a quick cleaning to keep it looking its best.

If the manufactured stone needs more than a quick rinse, don’t worry. The process is very simple, and you will be done before you know it. Just follow these five steps:

  1. Mix a cup or less of mild detergent with a few gallons of water. Never use harsh cleaners because they could cause the stone to fade. Some industrial strength cleaners are even strong enough to eat away at the stone.
  2. Give the stone a pre-rinse to loosen up any dirt or debris that may be clinging to the surface.
  3. Scrub the stone gently with a stiff bristle brush. Start with the dirtiest places, like where mud or dust has become caked on the stone. Remember to use a circular motion and clean your brush often or you will just spread the dirt around.
  4. Rinse your area thoroughly! Doing so is  very important because you have to make sure all of the detergent has been rinsed from the manufactured stone.
  5. Now just let it air dry and you are done for another few months.

What to do if you got mortar on your manufactured stone veneer

Getting mortar on your manufactured stone veneer happens quite a bit. Since manufactured stone is so much easier to work with than normal stone, DIY enthusiasts have been tackling the installation more and more. It may seem to be an easy afternoon project, but you can damage a veneer by doing simple things like:

  • Incorrectly placing the stones
  • Attempting the install in overly humid conditions
  • Wiping or digging into mortar that is still wet
  • Accidentally getting mortar onto the face of your veneer

If you do make a mistake and get mortar on your manufactured stone, all is not lost. You can correct the problem if you act quickly and follow these seven steps:

  1. Gather the equipment you will need for the job: water, dish detergent and two stiff brushes that are not wire and rags.
  2.  If the mortar is still fresh, then you  will have to wait for it to dry completely. In most environments, this will take a full day and night.
  3. Mix up a bucket full of warm water and dish detergent. There is one trick to this step that is you cannot have bubbles in the mixture. Keep mixing until all the bubbles disappear then set it aside for now.
  4. Using one of your stiff brushes, start wiping it across the mortar that you want to remove from your manufactured stone. It may help to put the brush at an angle, so you are wiping at the contact point between the mortar and the manufactured stone. You should continue this step until you get as much mortar off as possible.
  5. Now use one of the rags to remove all the dust that has accumulated on the surface of the veneer.
  6. Take your second brush and dip it into your water/dish detergent mixture. Use the same technique as before to remove the rest of the mortar and give the other parts of the exposed stone a good scrub while you are at it.
  7. Give the stone another once over with regular water and look for any residual mortar. It has probably all been removed by now but if you do still see some, just repeat step five again.

How to repair the cracks in your manufactured stone

Manufactured stone is a surprisingly strong and durable material, but nothing lasts forever. Even natural stone can be chipped and cracked over time. Damage over time can’t be entirely avoided, but with a little elbow grease, it can be easily fixed.

First you will need to gather a few tools:

  •  Broom
  • Trowel
  • Cold Chisel
  • Wire Brush
  • Hammer
  • Grout Bag
  • Mortar Mix

Once you have everything, you will need for the job, follow this procedure:

  1. Manufactured Stone | Custom Stone Veneer Repair
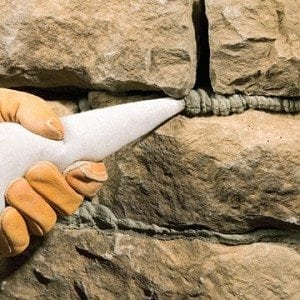
Find the first stone you want to replace. Use the cold chisel to chip carefully away the grout so that the stone comes loose. The best way is to hold the chisel at a 45-degree angle, pointing inward toward the stone you are removing. Once you have removed the grout, lightly tap the hammer around the edge of the stone to loosen it. If it still doesn’t budge, you may need to start chipping away at the stone itself.
  2. Once the stone has been removed you should see, the wire meshes it was attached to. Carefully use the wire brush to remove as much debris as you can without pulling the mesh away from the wall.
  3. When the hole is clear, measure it. If you have another stone of the correct size, then you are ready to move on. If you don’t, you may need to rent a wet saw to cut one to fit.
  4. Mix the mortar in a bucket until it becomes a paste.
  5. Put a thin coating of the mortar directly onto the wire mesh then apply a thicker coat, about a half inch, onto the back of the stone. Press the stone firmly into place and use the grout bag to fill in around the edges.
  6. Move on to the next piece and follow the same steps.

If you run into any questions or you feel like you need a professional to help you with the project, please call us at 888-823-0745.

Filed Under: DIY, Tips and Advice

Learn More about Native Custom Stone’s New Go-Brick® Brick Veneer

Brick has been a building material for years and years. It has been used for everything from castles in the middle ages to trendy nightclubs in the millennium. Today brick is considered a high end building material so it tends to give a project an air of sophistication and permanence.

Though working with real brick has quite a few drawbacks:

  • You really need to know what you’re doing if you plan on building with brick. There is a lot of weight involved and if you don’t have everything fitting together just right, it will all come tumbling down.
  • It is not a one man job. Consider all the things you have heard are”heavy as a load of bricks” and then consider having to literally cart bricks around all day while you build a wall. You’ll need a few people to help out if you want to avoid muscle strains, injuries and exhaustion.
  • It takes a lot of different tools to do it right. If you are going to measure and cut the bricks to fit together correctly, you need an impressive array of specialized tools.
  • Bricks are expensive. Just like anything else, perception is part of the value. Since brick is durable, long lasting and it is seen as being a high end material, it costs a lot of money.

Why choose Go-Brick® Brick Veneer?

GO-Brick Schoolhouse Red

Go-Brick Schoolhouse Red

For these reasons and many more, Native Custom Stone has developed a revolutionary new product called Go-Brick®.  Each brick is hand selected for its unique appearance and style. Then the brick is cut into the desired dimensions before a mold is made of it. This process results in a detailed, lightweight brick veneer that will look fantastic in any project.

Go-Brick® was not designed with a professional brick layer in mind. It was designed for the DIY minded people who want to improve their home with their own two hands. Find a Native Custom Stone distributor near you today to order Go-Brick®!

Filed Under: DIY, Go-Brick Brick Veneer Tagged With: brick veneer, custom brick veneer

Want an Easy Weekend Project? Pick up Go-Stone at Home Depot

Do it yourselfing used to be a survival trait. When something broke and you didn’t have enough money to hire a contractor, you did it yourself. Over time DIY has developed into a full blown hobby and even people that can afford to hire outside help, enjoy tinkering around on their own. The stumbling block new DIY’ers have is finding good projects to start with. Everyone makes mistakes at first so your first few projects need to be manageable. Lucky for them, there’s Go-Stone.

Jay'sFirePlaceAfterGo-Stone is a revolutionary new product from Native Custom Stone designed specifically for the do it yourselfer. It is a light weight, easy to install, stone panel system that makes it simple for you to construct:

  • Stone fireplaces
  • Custom backsplashes
  • Accent walls
  • Wet or dry bars
  • Custom projects

There are a lot of factors that make Go-Stone a do it yourselfers dream. Go-Stone is:

  • Extremely light – Go-Stone is 50% lighter than actual stone so one person can easily work with it. When working with natural stone, you always want a buddy close by in case something happens or you need a hand. With Go-Stone there is much less danger of back and neck strains through improper lifting and if you drop a piece on your foot, it will probably just hurt a lot instead of causing injury.
  • Very easy to install – When working with regular stone you have to make sure everything is securely mounted to the wall. As mentioned above, you will be dealing with a lot of weight and if mounted incorrectly, someone will get hurt. Go-Stone is so light that you can actually mount it to the wall with tile adhesive and it will be perfectly secure. Even if a piece does come loose at some point in the future, making a quick repair is a simple process.

If you are looking for a new project involving stone then you need to look into Go-Stone. It makes everything so much easier and it can be found at your local Home Depot.

Filed Under: DIY, Go-Stone Panels, Manufactured Stone, manufactured stone Tagged With: DIY, go-stone, home depot, manufactured stone, stone project

How to Create a Beautiful Custom Stone Patio

Most of the patios on older southern homes are just a flat slab of concrete. They are not very interesting and they definitely don’t make you want to invite friends over for a backyard cookout. The problem is that it is often too expensive to tear it out and have a new patio built. With the growing popularity of Native Custom Stone, many people have found a way around that particular problem. When you are laying down a Manufactured Stone Patio you need to have a concrete slab in place anyway so you can just build on what’s already there and a Custom Stone Patio will definitely add a little visual flair to your next get together.

If you would like to transform your eyesore of a patio into a Custom Stone Patio then you will need to gather a few materials:

  • manufactured stone patio | native custom stoneCement trowel
  • Flat ended shovel
  • Wheelbarrow
  • Concrete mix
  • Flat pacing stones
  • Masonry saw
  • Garden hose
  • Dish soap
  • Brush
  • Broom
  1. Sweep off the patio to clear all debris then clean it thoroughly. You need a spotless surface to build on. Once you are finished let it dry out.
  2. Place your stones down where you want them to go leaving about an inch between them. If they won’t fit correctly you may need to make alterations with your masonry saw.
  3. Use the shovel to mix up the cement in your wheelbarrow. Start at one end and lift up a stone. Smear about a half inch of cement on the stone and another half inch on the patio where it will go. Press it firmly back into place until it starts to squirt up through the spaces.
  4. Continue doing that with every stone. Once you have done a few go back and trowel extra cement into the spaces where needed and scrap off any excess cement.
  5. Mist the patio with your garden hose and then let it dry over night. Do it again every morning and evening for the next 2 days. After that you are finished.

Filed Under: Custom Stone Accents, DIY, Faux Stone Veneer, Maintenance and Installation

How to Install a Cultured Stone Interior Wall with Mastic

Cultured stone can add an element of luxury to any home by installing it on an interior wall. It’s an affordable alternative to having natural stone installed…plus it’s easy to do it yourself.

What You Will Need to Install Cultured Stone:

  • Native Custom Stone’s Cultured Stone
  • Mastic
  • Wire Mesh
  • Trowel
  • Wire Cutters 
  • Work Gloves
  • Goggles
  • Tape Measure
  • Tarp (Floor Protector)
  • Staple Gun
  • You may also need a Wet Tile Saw
  • Prestige Brown LedgeStep 1 – Prepare your interior wall. Measure your wall area and cut your wire mesh to fit. Ensure that your wire mesh doesn’t overlap. Staple the mesh to the wall using a staple gun every 4 to 6 inches by 4 – 6 inches.
  • Step 2 – Cover you wire meshed wall with a layer of mastic before beginning installation. Using your flat trowel ensure that you cover the wire mesh enough to fill all voids between the mesh and existing wall. Check to make sure that it is bonded well to it’s surface. Allow the mastic to dry for 24 hours before you get started with your stone.
  • Step 3 – Begin installing your cultured stone from the bottom working up. Apply mastic to the back of the stone and apply to the surface. The stone, just like a natural stone will vary in size, so you may find that you need to cut it to fit using a wet tile saw. If you have to use the wet saw ensure that you’ve dried the stone before applying mastic.

TIP: You want enough mastic to ooze a bit when you press the stone to the surface, but not so much that it oozes beyond the joints of two stone pieces.

  • Step 4 – Allow your stone to dry for 72 hours before sealing the stone. Use this guide to learn how to clean your stone once installation is complete. Enjoy!

Native Custom Stone can create a custom stone color and style based on your needs. Contact a Native Custom Stone vendor near you to find our more about their beautiful cultured stone products.

Filed Under: Custom Stone Accents, DIY, Maintenance and Installation Tagged With: DIY Stone Wall, interior cultured stone, interior design, manufactured stone interior

How to Care for a Cultured Stone Fireplace

The associates at Native Custom Stone have already taught us how to install a cultured stone fireplace using their stone panels, but now we need to talk about the proper way to care for a cultured stone fireplace to keep it looking great for years to come.

It doesn’t take much to care for your cultured stone fireplace, all you will need is:

    • A Vacuum Cleaner with Brush Attachment
    • A Vacuum Hose Extension
    • Broom 
    • Water 
    • Cleaning Rag
  • Cultured Stone Fireplace | Manufactured Stone | Native Custom StoneStep 1 – Vacuum the entire surface of your fireplace. Make sure to get mantles and remove all décor to ensure a thorough cleaning. Use your vacuum’s brush attachment to gently loosen the dust and debris, you don’t want to use the exposed hose and accidentally scratch your stone. Use the extender for high or hard to reach places.
  • Step 2 – Use a rag moistened with water, or manufactured stone cleaner if your prefer, to get rid of stubborn spots of debris. Make sure that you allow the cleaner to dry completely before lighting a new fire, as some of the chemicals can be flammable.
  • Step 3 – Use your broom to sweep up any mess made that the vacuuming may have missed or knocked to the floor. For extra cleaning power use your wet rag to get in the grout along the base of your fireplace, and to wipe up stubborn dust that may be on the floor.

Native Custom Stone recommends that you do this once a month to maintain a beautiful fireplace. These same methods can be used on interior and exterior fireplaces, though your exterior fireplace may need a little extra elbow grease and hose down to get it clean.

If you haven’t already chosen to install a cultured stone fireplace, find your closest Native Custom Stone vendor to choose the perfect cultured stone for a beautiful new fireplace.


Filed Under: Custom Stone Fireplace, DIY, Maintenance and Installation Tagged With: cleaning cultured stone, cleaning manufactured stone, cultured stone, cultured stone fireplace, fireplace, manufactured stone fireplace

How to Install Your Own Manufactured Stone Arch

It’s kind of funny when you think about it. Our earliest ancestors built stone arches and various other architectural elements because stones were plentiful and cheap. Then once we became civilized, stone became more and more expensive until people had to stop using it just because of the high price. Luckily manufactured stone was invented and now we can add a little style and substance to our outdoor projects without breaking the bank.

Before you begin to install your manufactured stone onto your arch you will have to gather a few items.

You will need:

  • Tile sealant
  • Buckets
  • Sponge
  • Grout bag
  • Four inch grinder
  • Chipping hammer
  • Acrylic modified thin set
  • Measuring tape
  • Pencil
  • Pointing trowel
  • Mason’s Trowel
  • Nylon brush
  • Safety goggles
  • Ladder

Once you have everything together you can start going through these steps:

  1. Manufactured Stone Arch | Native Custom StoneLay out all of the manufactured stone pieces under the arch. Check your manufactured stone corner pieces to make sure they have fully dried or “cured”. The corner pieces are always installed before the rest because they act as an anchor for them to tie into.
  2. Mark the center of the arch with a straight line using your pencil. Make sure your first piece is centered on that line and stagger the corner pieces with your first installation piece. Mark an outline of where the piece will go.
  3. Mix the acrylic modified thin set until it is stiff. It should remain sticky and reasonably hard to smear with a trowel. Give the back of the piece a thick coating and make sure it is consistent to fill in gaps. Lightly coat the place where you will be putting the piece for extra adhesion. Take care not to get any of the mixture onto the surface of your manufactured stones.
  4. Using the ladder put the piece into place under the arch. Lean into the piece as you apply it so that your body weight will help hold it in place. Keep pressure on the piece if you need to slide it from side to side so you don’t accidentally drop it. Step back and look at the piece for a few moments to make sure it is not sagging.
  5. Keep going through the 4th step until all the pieces are in place. Start cutting the pieces using a chipping hammer or the 4 inch grinder. Once you are finished you should let the stones sit for about 24 hours.
  6. Get your sponges and nylon brush along with a bucket of water. Start cleaning the pieces but be careful not to accidentally mark the surface. Once the pieces are clean you will have to wait for them to completely dry before continuing.
  7. Use the grout bag to start putting grout into the cracks between the stones. The grout should easily come out of the grout back but be thick enough to adhere to the underside of the arch. Avoid getting grout onto the surface of the stone as much as possible and wipe it off with a wet cloth when you do. Wait for the grout to dry before you start tooling it with trowels. When you have finished, wait 24 more hours before starting the next step.
  8. Seal the stones with masonry or tile sealant. The best way to apply the sealant is with a spray bottle. Keep applying the sealant until the sealant is no longer able to get through to the stone.

Filed Under: Custom Stone Accents, DIY, Maintenance and Installation, Manufactured Stone Tagged With: arch way stone, custom stone veneer, dawsonville ga stone, diy manufactured stone, diy manufactured stone entry, manufactured stone, native custom stone, stone arch

Why Should You Use Manufactured Stone Veneer In a Bathroom

Manufactured stone veneers are getting used in more and more places around the house. Everyone has seen how good it looks around a fireplace as a center piece for a room. It looks equally good on the outside of a home because it lends a certain rugged charm but have you ever considered using it in your bathroom? The basic qualities of a manufactured stone veneer are its amazing durability and its almost complete resistance to moisture and staining. If you are shopping for the perfect building materials for your bathroom then durability and stain resistance are probably the two things you are specifically searching for.

Manufactured Stone | Custom Stone Veneer | BathroomUp until recently, only the most affluent homes could have natural looking bathrooms covered in marble and other high end stone. The price tag on bathroom projects like these would sometimes rival a small house but with a manufactured stone veneer they became a much more practical design decision. Even middle income homeowners can afford to own:

  • Unique vanity top designs. These are made out of stylish stone that really adds a dash of elegance to a room.
  • Decorative accents made from cultural marble. Marble is always a hit and most people cannot tell natural stone apart from its manufactured counterpart.
  • Cultured Onyx, Granite and Piedrafina. These stones and many more are available in manufactured varieties and they are very easy to work with.

If you have never seen manufactured stone then you may think that it will look cheap or fake. Most manufactured stones are actually made from rock dust instead of plastic or synthetic materials so it is an actual stone, just not a naturally formed one. This process of formation is the main reason that manufactured stones are so easy to work with. Liquid polyester is utilized to make all the rock dust stick together and then it is covered in a non porous coating that resists stains and spotting. The end result is that you are left with a bathroom that doesn’t absorb moisture or hold onto odors and it can be easily cleaned with soap and water for the most part.

There is one thing to be careful of when buying manufactured stone veneers and that is to get them from a reputable company. Some will skimp on the manufacturing process and it can result in you buying inferior manufactured stone.

Filed Under: Custom Stone Bathroom, DIY, Maintenance and Installation, Manufactured Stone Tagged With: bathroom design, bathroom projects, building materials, construction, custom bathroom designs, custom stone, manufactured stone, manufactured stone veneer, manufacturing, masonry, stone veneer, stones, veneer

How to Remove Mortar from Manufactured Stone Veneer

Manufactured stone veneers have become a very popular project for do it yourself homeowners. The stone adds elegance and rustic charm to everything from your fireplace to the outside of your home. Since it basically amounts to sticking rocks in mortar, building a manufactured stone veneer seems like it would be very easy but it can go wrong quickly. A veneer can be ruined by things as simple as:

  • Accidentally wiping mortar that’s still wet
  • Getting excess mortar onto the stones surface
  • Overly humid conditions
  • Incorrect stone placement

Once the stones are in place, it can be a chore to remove mortar from them without damaging the stones. However, if you do make a mistake and need to remove your mortar, it can be done in seven easy steps:

  1. Manufactured Stone Veneer | Custom Stone | MortarGather the equipment that you will need for the job: water, dish detergent, two stiff brushes that are not wire and rags.
  2. If the mortar is still fresh then you must wait for it to dry completely. In most situations a full day and night will be needed to thoroughly dry fresh mortar.
  3. Mix up a warm water and dish detergent solution. The only trick to this step is that you cannot have bubbles in the mixture so keep mixing until all the bubbles disappear. Set it aside for now.
  4. Using one of your stiff brushes, start wiping it across the mortar that you need to remove from your manufactured stone. It may help to put the brush at an angle so you are wiping at the contact point between the mortar and the manufactured stone. Try to get as much of the mortar off as possible during this step.
  5. Use one of the rags to remove all the dust that has been accumulated on the stones surface.
  6. Take your second brush and dip this one into your water and dish detergent mixture. Use the same technique as before to remove the rest of the mortar and give the other parts of the exposed stone a good scrub while you are there.
  7. Now give the stone another once over with regular water and look for any residual mortar. It has probably all been removed at this point but if you can still see some just repeat step five again.

Filed Under: Adhered Stone Veneer, Custom Stone Accents, DIY, Faux Stone Paneling, Faux Stone Veneer, Maintenance and Installation, manufactured stone, Tips and Advice Tagged With: brush, custom stone, detergent solution, manufactured stone, manufactured stone veneer, masonry, mortar, stone mortar, stone surfaces, stone veneer, stones, veneer

How to Repair Cracked Manufactured Stone Veneer

Quite a few homeowners have decided to install a manufactured stone veneer instead of natural rock. In most situations it is a smart decision because they look the same, last forever and cost a lot less than the natural stone equivalent. Over time any type of veneer can become damaged, cracked or chipped just through normal wear and tear. Unlike natural stone, you can repair your own manufactured stone veneer in 5 easy steps. Before you get started with repairs, there are a few items that you will need to get including: a small broom, trowel, cold chisel, wire brush, a hammer, grout bag and mortar mix.

  • Manufactured Stone | Custom Stone Veneer RepairStep One:  Find the damaged veneer piece and place the cold chisel on the grout line. It needs to be at a forty five degree angle with the tip of the chisel facing inward towards the stone piece. Lightly tap the hammer on all sides of the broken piece to loosen the grout and remove the stone. If it refuses to come loose, you may need to chip away at the piece itself until it comes free.
  • Step Two:  Use the wire brush to clear away the debris and dust from where the stone piece was removed in step one. Be careful of the wire mesh inside the socket because you do not want to pull it away from the foundation of the veneer. That mesh is what you will be securing the new piece onto.
  • Step Three: Measure the hole that was left and find a piece of stone veneer that will fit into it. If you cannot find one small enough you can use a wet saw to cut a large piece down to size.
  • Step Four: Get a bucket and mix the mortar with water until it thickens into a paste.
  • Step Five: Apply a thin coat to the wire mesh, otherwise known as a Skim coat. Then you can apply a half inch thick layer of mortar onto the Skim coat using a trowel. If that is too big then you can substitute a putty knife. Now apply a half inch layer of mortar to the back on the replacement stone piece and press it solidly into place. Once the piece is in position you can use a grout bag to squeeze out a line of grout around the perimeter of the new piece. After that the only thing left to do is wait for it to dry.

Filed Under: DIY, Maintenance and Installation, Manufactured Stone, Tips and Advice Tagged With: building materials, custom stone, manufactured stone, manufactured stone veneer, masonry, repair crack, stone repair, stone veneer, veneer, veneer repair

  • « Previous Page
  • 1
  • 2
  • 3
  • Next Page »

Cart

Visit the Showroom

Visits to the Native Custom Stone Showroom are by appointment only. Call (888) 823-0745 today to schedule!
 

Find a Vendor

Filter by

No results found in this location. Please try again.

Get Directions

Add Waypoint
show options hide options
Print directions Reset directions
Fetching directions......
Reset directions
Print directions

Contact Us

Stone Types

  • Castle Rock
  • Country Villa
  • Field Stone
  • Ledge Stone
  • River Rock
  • Rubble Stone
  • Stack Stone

Tech Links

  • CAD & Installation Details
  • BIM | Revit | Autocad
  • Testing & ICC-ESR Report
  • 3-Part Spec & MSDS
  • Product Warranty
  • LEED Details
  • Cleaning Instructions
  • Product Data

Resources

Native Custom Stone Lunch and Learn | Stone Installation Information Download Our Brochure | Native Custom Stone Brochure Download

Contact Info

Native Custom Stone
236 Hightower Parkway
Dawsonville, Ga 30534
Phone: (888) 823-0745
Phone: (706) 216-5545

Follow Us!

Follow Us on FacebookFollow Us on LinkedInFollow Us on Google+Follow Us on TwitterFollow Us on MySpaceFollow Us on FriendFeedFollow Us on OrkutFollow Us on HyvesFollow Us on aSmallWorldFollow Us on FlickrFollow Us on InstagramFollow Us on PicasaFollow Us on PinterestFollow Us on YouTubeFollow Us on About.meFollow Us on VKFollow Us on SkyrockFollow Us on SkypeFollow Us on DiggFollow Us on RedditFollow Us on DeliciousFollow Us on StumbleUponFollow Us on TumblrFollow Us on GithubFollow Us on BuzzFollow Us on Google TalkFollow Us on VimeoFollow Us on BloggerFollow Us on WordpressFollow Us on YelpFollow Us on Last.fmFollow Us on PandoraFollow Us on UStreamFollow Us on IMDbFollow Us on HuluFollow Us on FlixsterFollow Us on FoursquareFollow Us on MeetupFollow Us on PlanCastFollow Us on SlideShareFollow Us on DeviantArtFollow Us on iTunesFollow Us on Live365Follow Us on Digital TunesFollow Us on SoundcloudFollow Us on BandcampFollow Us on EtsyFollow Us on Better Business BureauFollow Us on Merchant CircleFollow Us on EbayFollow Us on SteamFollow Us on SlashdotFollow Us on GoodreadsFollow Us on Cuttings.meFollow Us on BlogFollow Us on RSS

Actual stone colors may appear different in pictures due to pigments and lighting. Native recommends viewing actual samples prior to placing an order.
Website Designed by: Grater Digital |  Sitemap  |  Privacy Policy